

How the Queue Is Organized
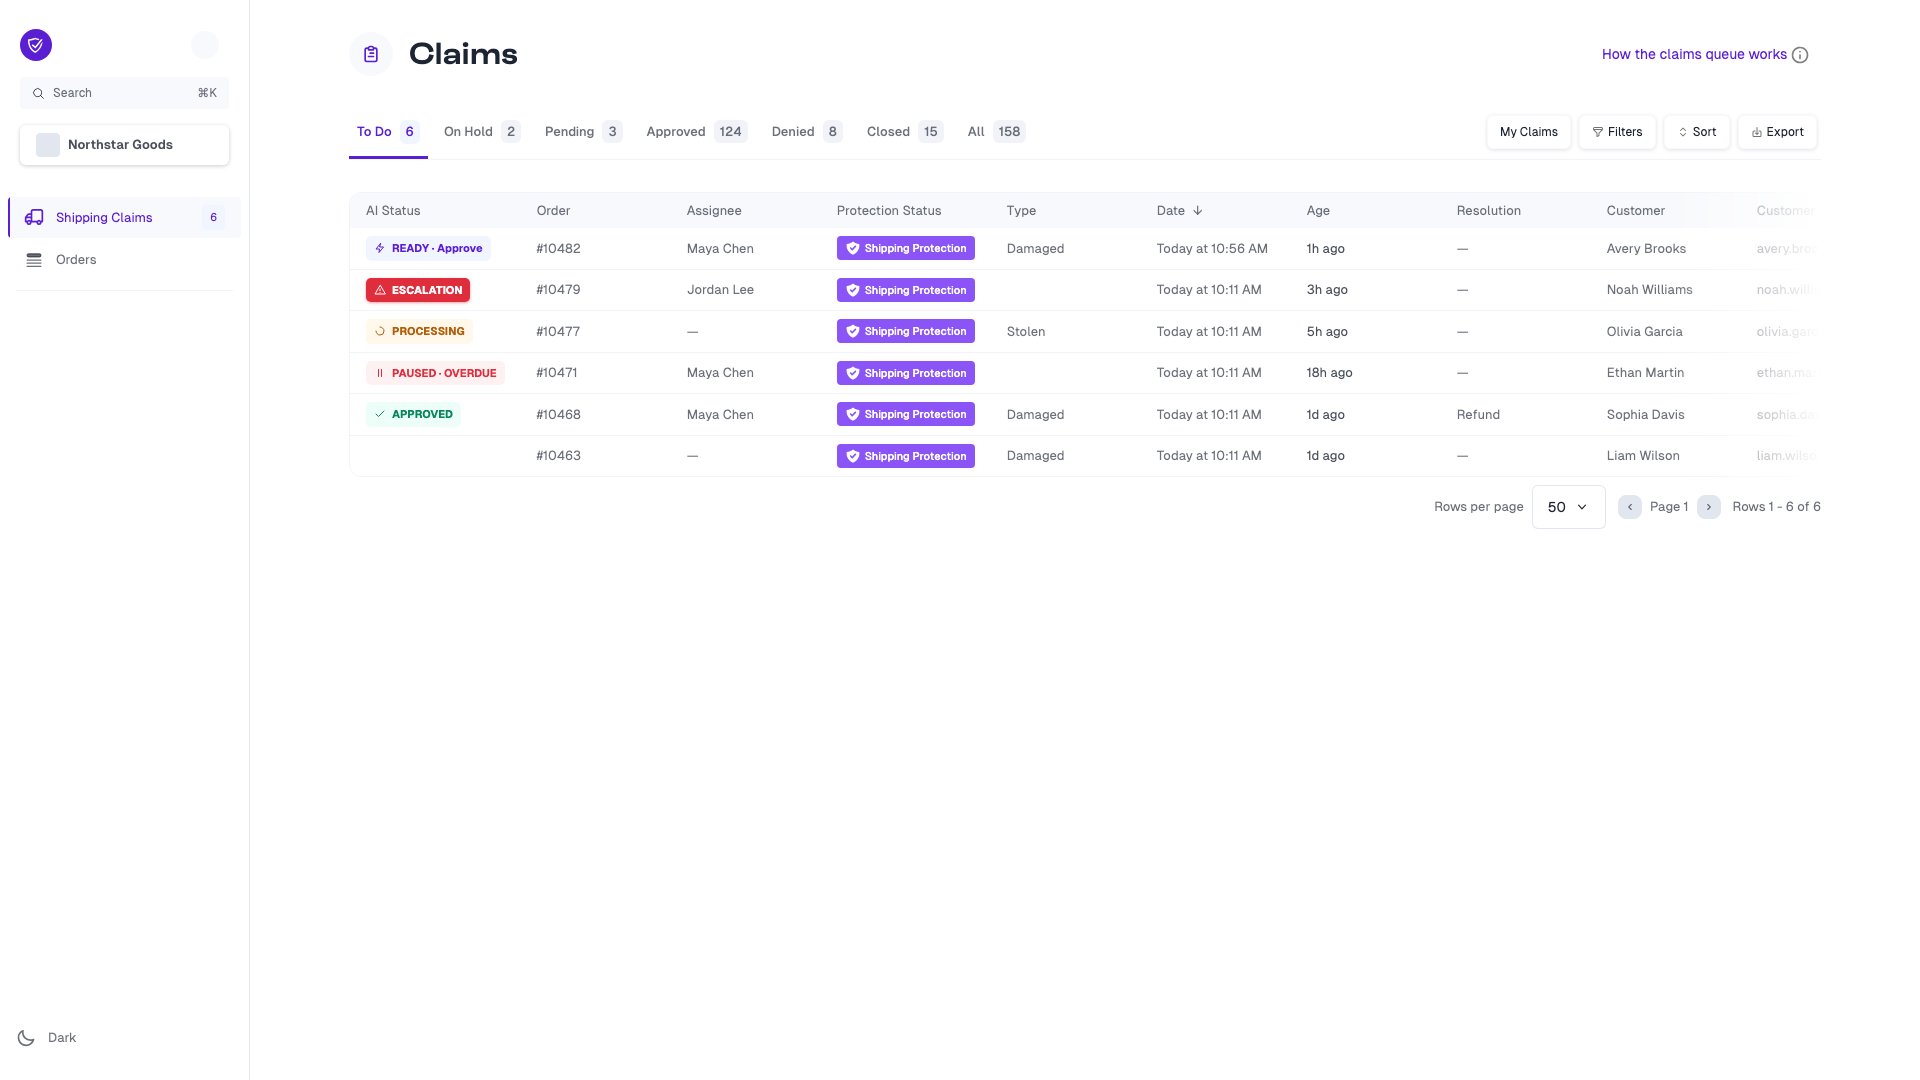
The number beside each tab shows how many claims are currently in that status.Prioritizing Your Work
The queue includes several tools for finding the claims that need your attention:- My Claims shows only claims assigned to you. You can use it from any status tab, and the tab counts update to match your claims.
- The Assignee column on To Do shows who owns each claim. A dash means the claim is unassigned. Open a claim to assign or reassign it.
- Filters narrow the queue by details such as claim type, customer, protection status, AI status, or resolution. You can combine filters to create a more specific view.
- Sort on To Do lets you order claims by when they were created or last updated.
- Age on To Do shows how long ago the claim was filed, while Date shows its latest update.
Understanding AI Status
For stores using Claim Automation, the AI Status column appears on the To Do, On Hold, and Pending tabs. It shows what the AI has done and whether a person needs to step in.
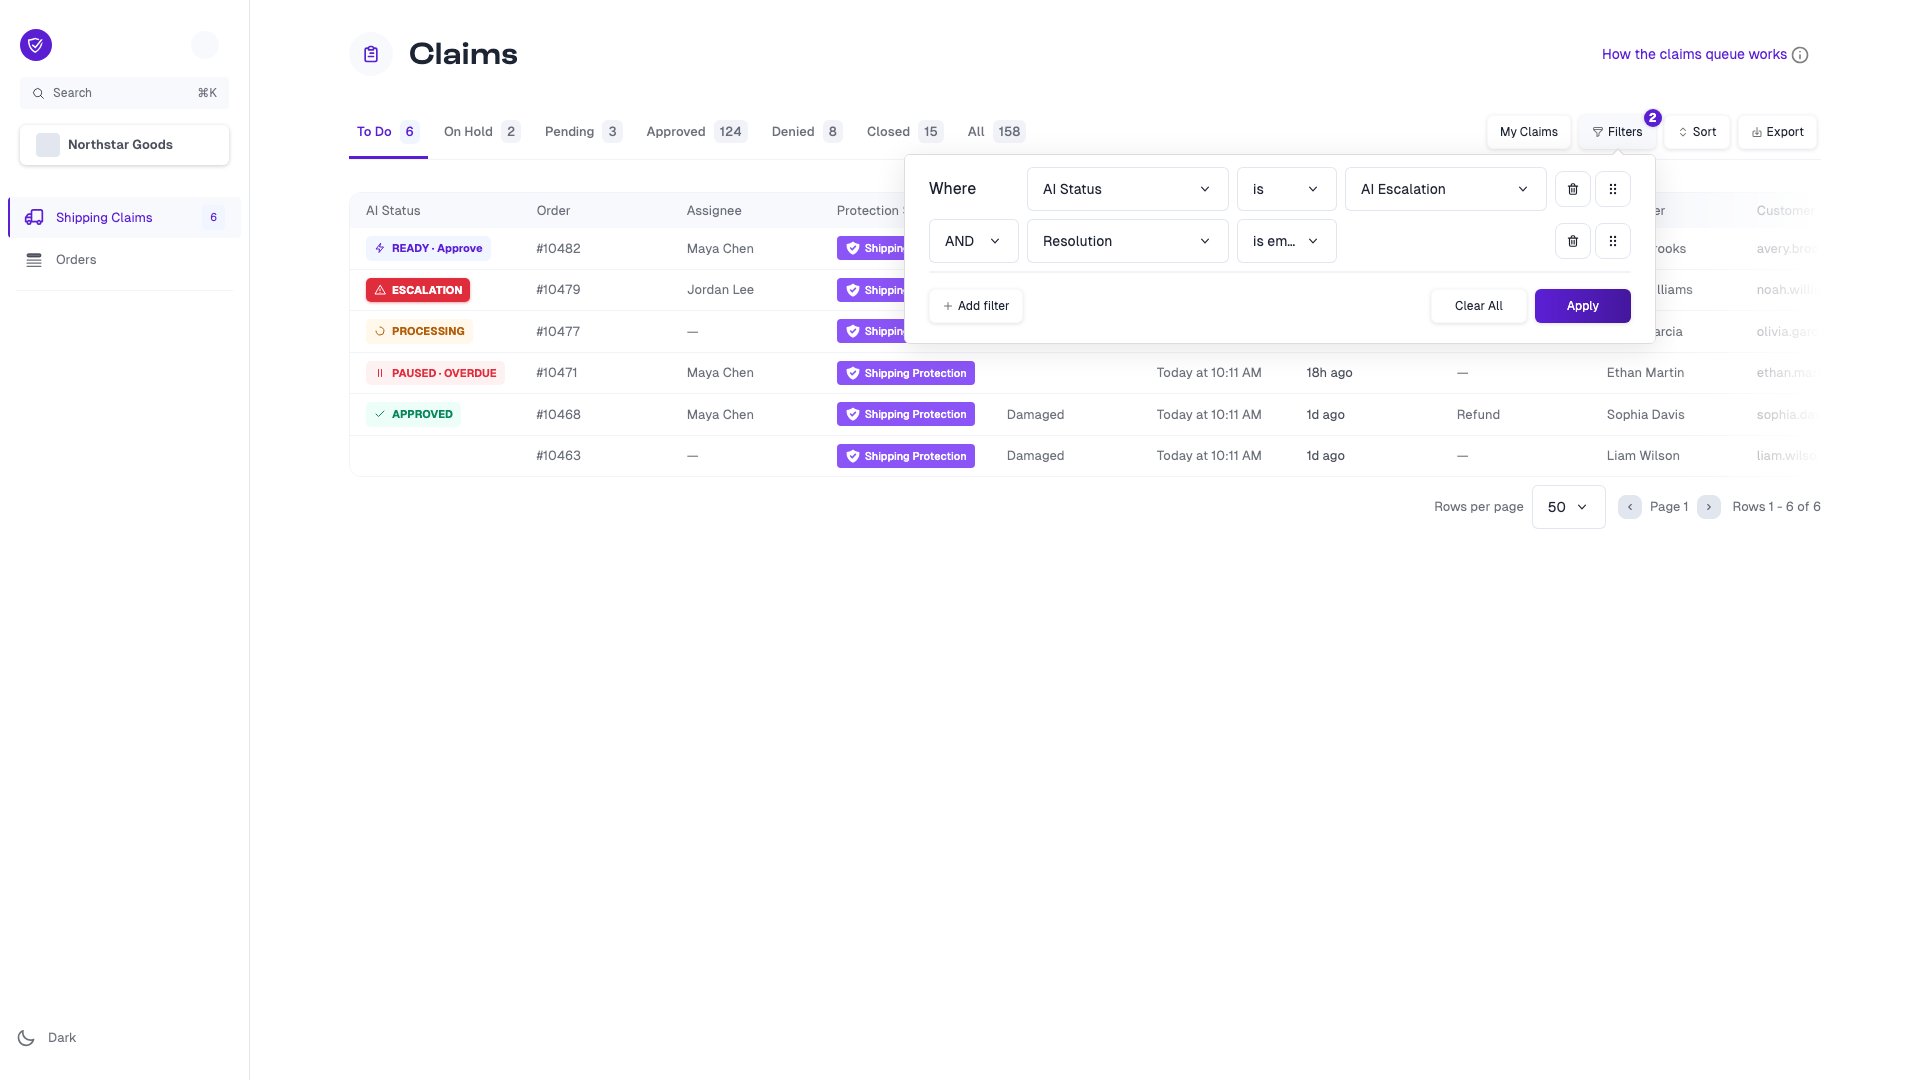
Use the AI Status filter to find queued, processing, ready, escalated, or paused claims. Select Needs Attention to find paused claims whose follow-up is overdue. AI Status is empty finds claims the AI has not touched, while is not empty finds claims with AI activity.
AI Status vs. Resolution
AI Status describes the AI’s work or recommendation. Resolution shows the claim’s actual recorded outcome, such as a refund, reshipment, or store credit. These values can differ. For example, a claim can return to To Do after it was resolved if a new customer message reopens it. In that case, the existing resolution remains visible so your team can recognize the previous outcome before taking action. A dash in the Resolution column means there is no current resolution record. To find unresolved claims, add the filter Resolution is empty. Use Resolution is not empty to find claims with a recorded resolution.Moving Through the Claim Stages
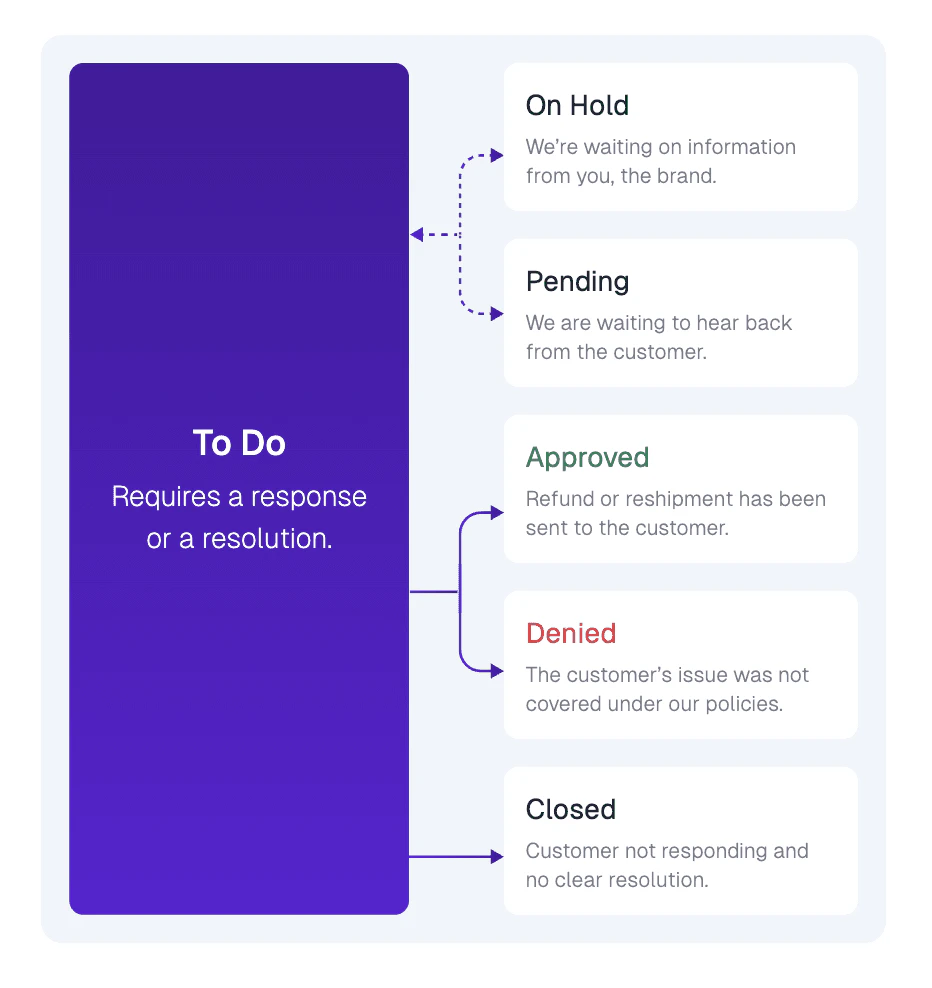
Claims typically start in To Do. Depending on what is needed, they can move to On Hold or Pending and return to To Do when new information arrives.- If approved, the claim moves to Approved and its resolution is issued.
- If the issue is not covered by our protection policies, the claim moves to Denied.
- If no further action can be taken, the claim moves to Closed.
When We Need Your Team: On Hold
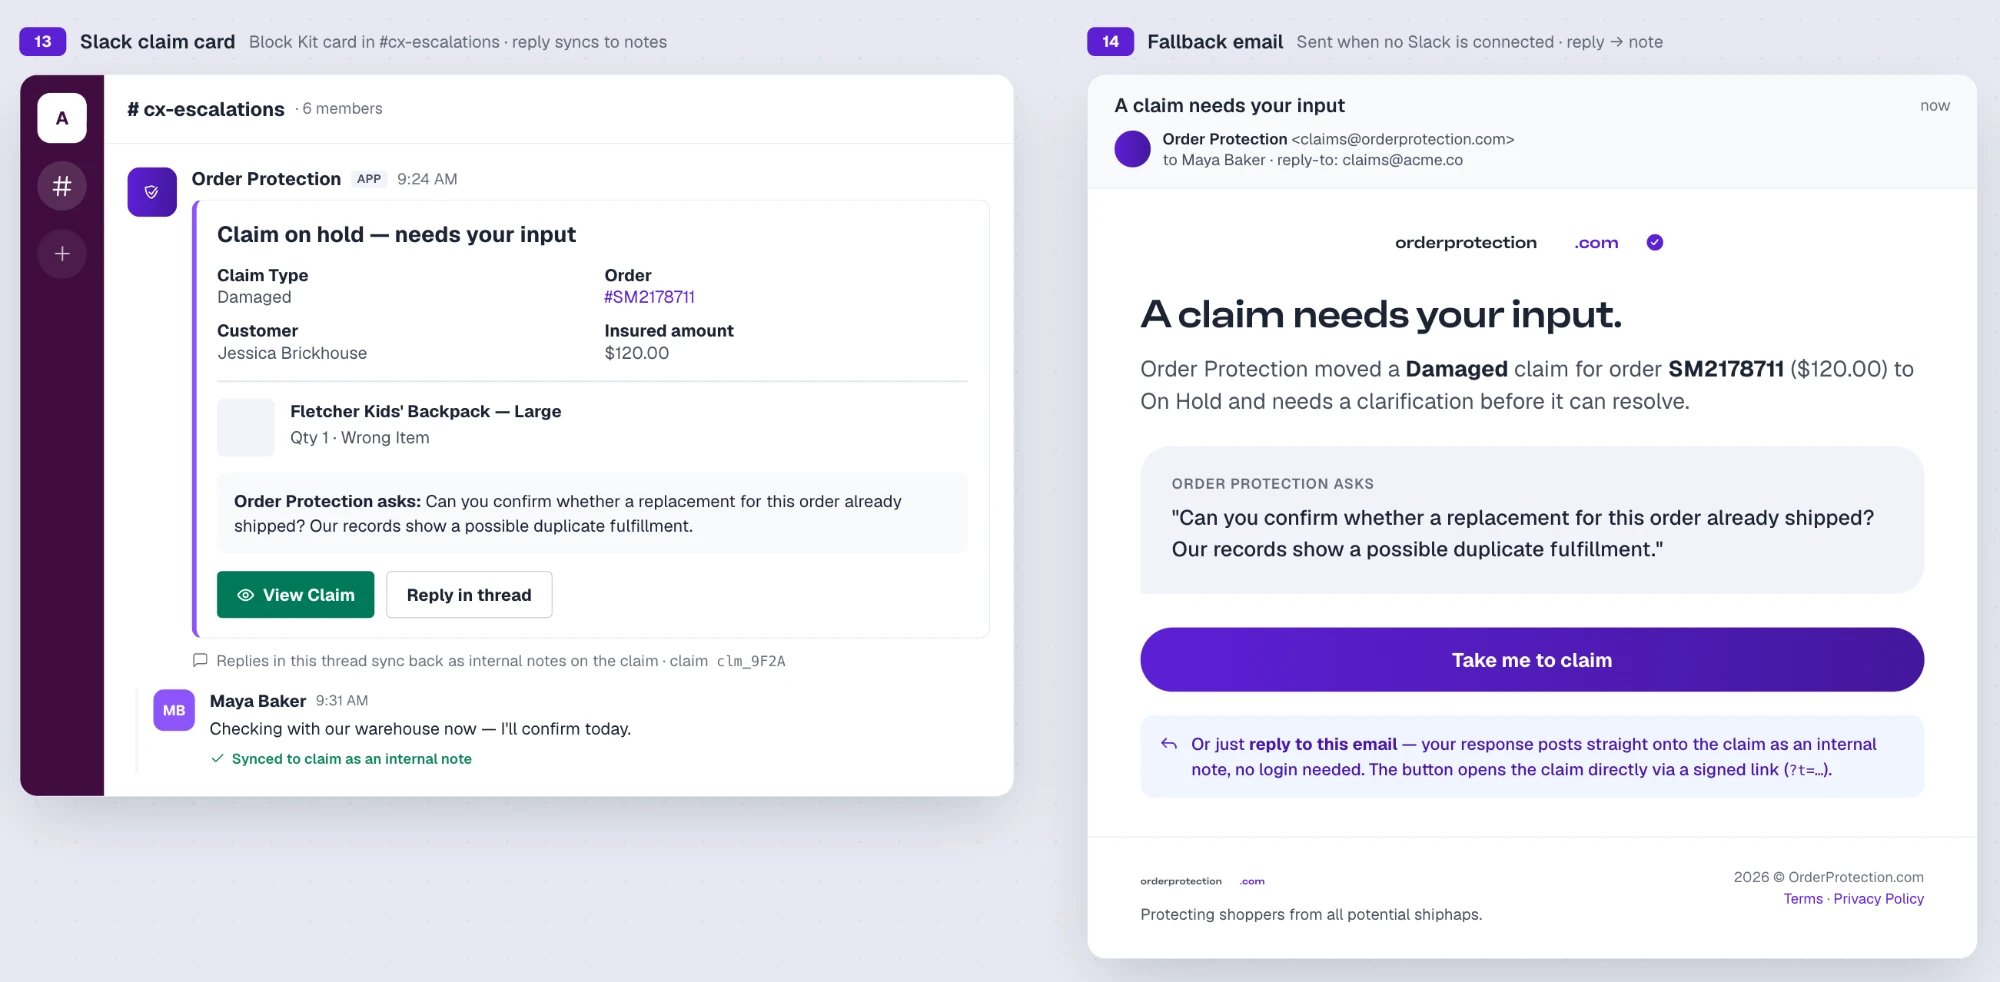
Most claims are resolved without your team. When the AI or one of our brand agents needs something only you can answer, such as whether a replacement already shipped, which SKU to send, or whether you will approve an exception, we move the claim to On Hold as Waiting for Brand. The question is saved on the claim as an internal note.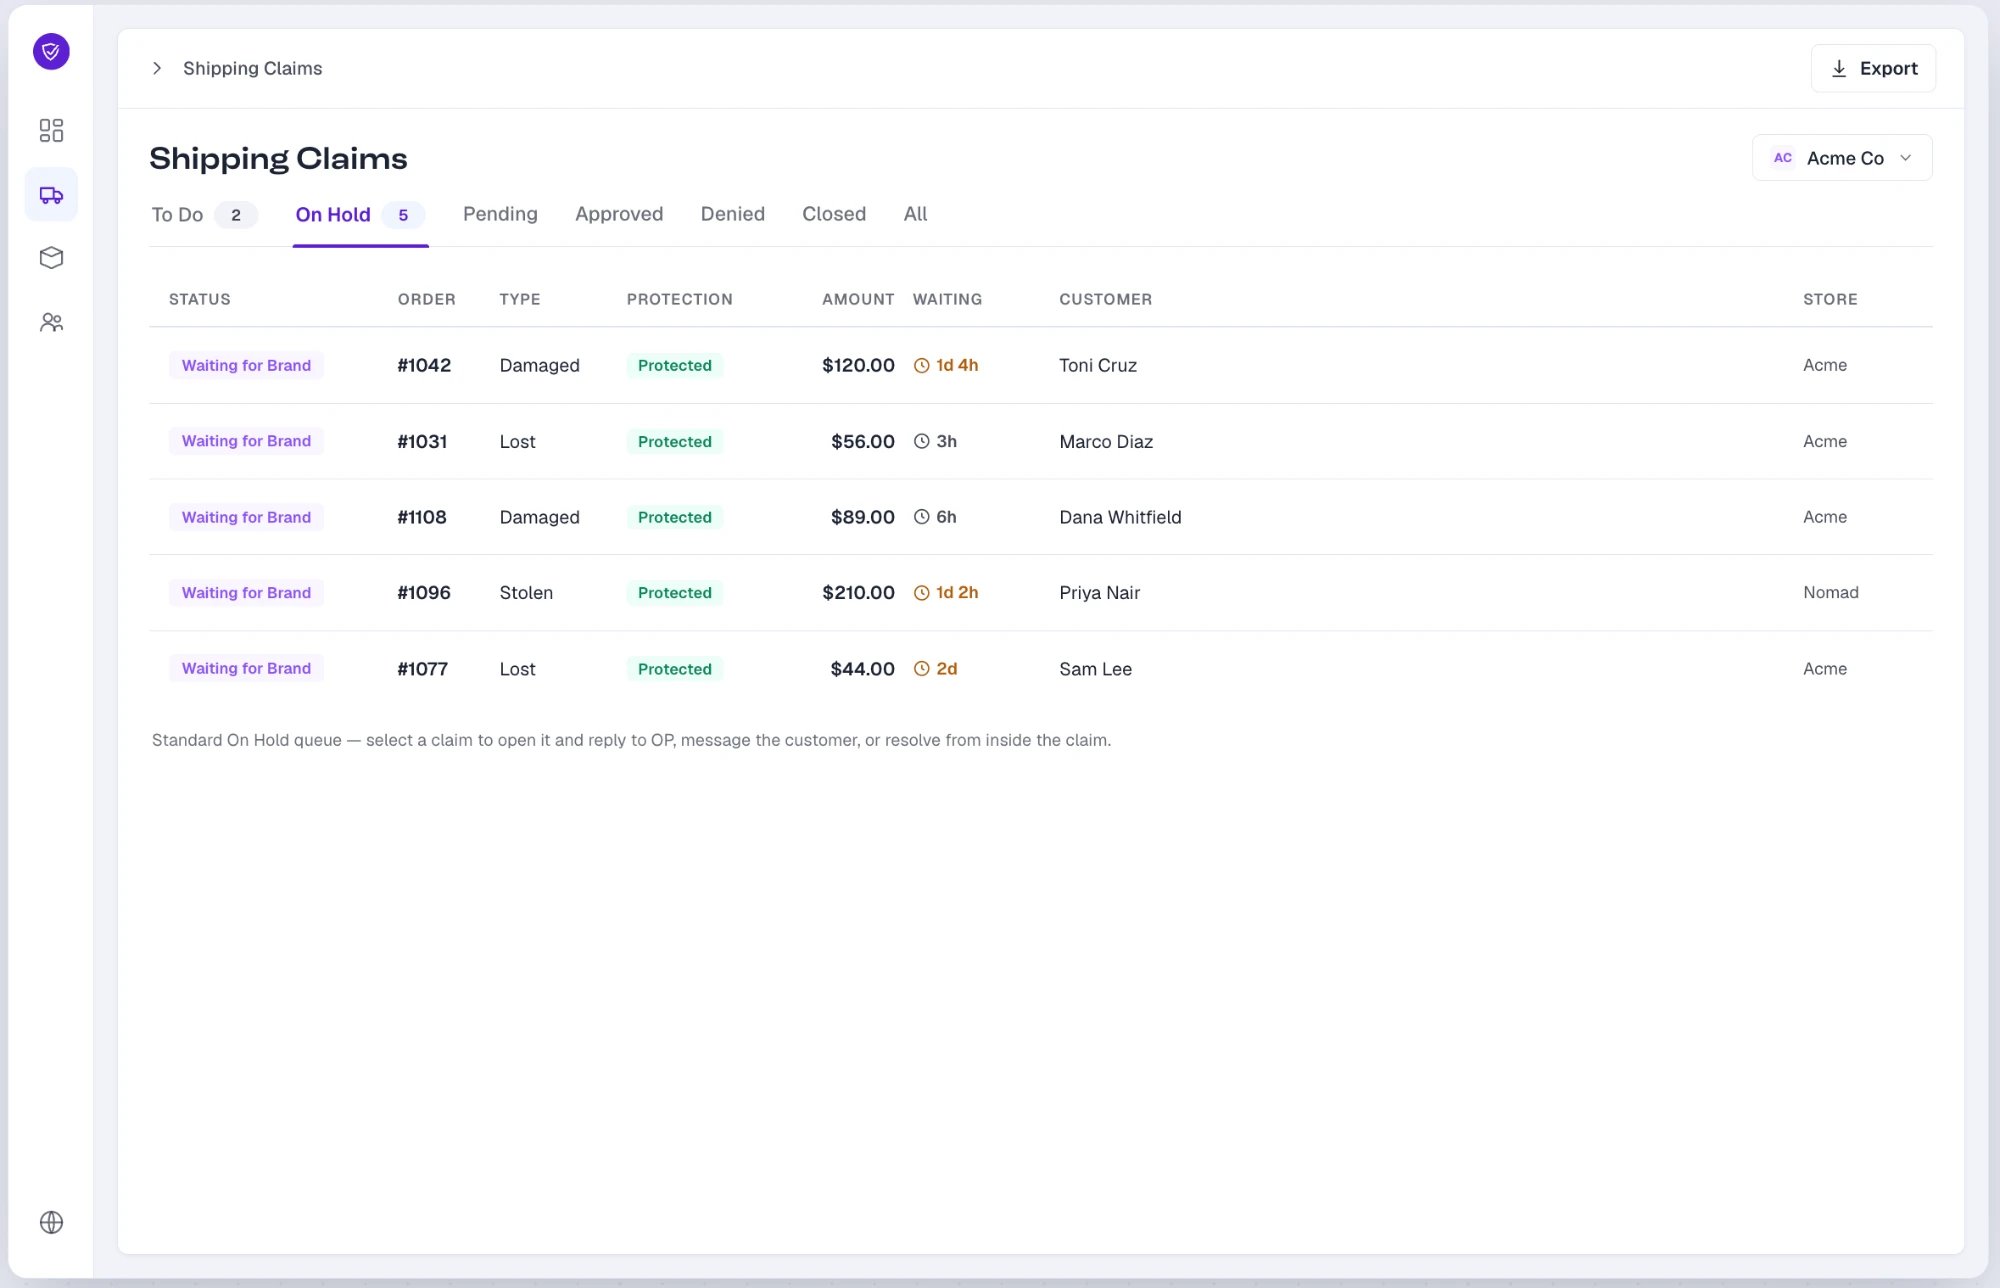
- Slack (primary). If your store’s Slack integration is connected to a channel, we post a claim card there. The card shows the claim type, order, customer, insured amount, items, and our question. It includes View Claim and Reply in thread buttons. We only post when a claim actually needs your team, so the channel isn’t flooded with every new claim.
- Email (fallback). If Slack isn’t connected, the same question is sent to your store’s Claims Email.
Responding to an On Hold Claim
You can answer from wherever you received the question:- Reply in the Slack thread. Each reply is saved on the claim as an internal note. When a verified member of your team replies, the claim comes off hold and returns to the AI to continue.
- Reply to the email. Your reply is posted onto the claim as an internal note, and you don’t need to log in.
- Open the claim. Select View Claim in Slack, or Take me to claim in the email, to open the claim in your dashboard. You can also open it from the On Hold tab to add a note, or resolve it if you have the Escalation Resolver permission.
The View Claim and Take me to claim buttons open the claim in your dashboard, so you’ll need to be logged in. Replying in Slack or by email doesn’t require a login.
Who Can Resolve On Hold Claims
By default, brand users can add internal notes to an On Hold claim. To message customers and resolve On Hold claims directly, a user needs the Escalation Resolver permission. It is added on top of the user’s base role, not instead of it. Escalation Resolver is granted per person from the team member’s profile under Additional permissions. Only OrderProtection.com can turn it on. Brand admins can see the setting but can’t change it. To request it for someone on your team, contact your Customer Success Manager.Where Questions Are Sent
You can review your escalation routes in Settings → Claims → Escalations / Team Visibility:
On the Contact settings tab, you can also choose which claim emails your Claims Email receives:
- Send email for only escalations. Email arrives only when a claim is handed to your team. This is the default.
- Send email for all claims. Email arrives for every new claim, as well as escalations.
Asking Us About an Order in Slack
The Slack channel also works in the other direction. If your team has a question about an order, post it in your shared Slack channel with OrderProtection.com and include the order number. We look the order up within your store only and reply in a thread with the claim card. If the order has no claim, we reply with an order card instead. Everything posted in that thread is saved to the claim (or order) as an internal note, so the full conversation is kept on the claim, not just in Slack.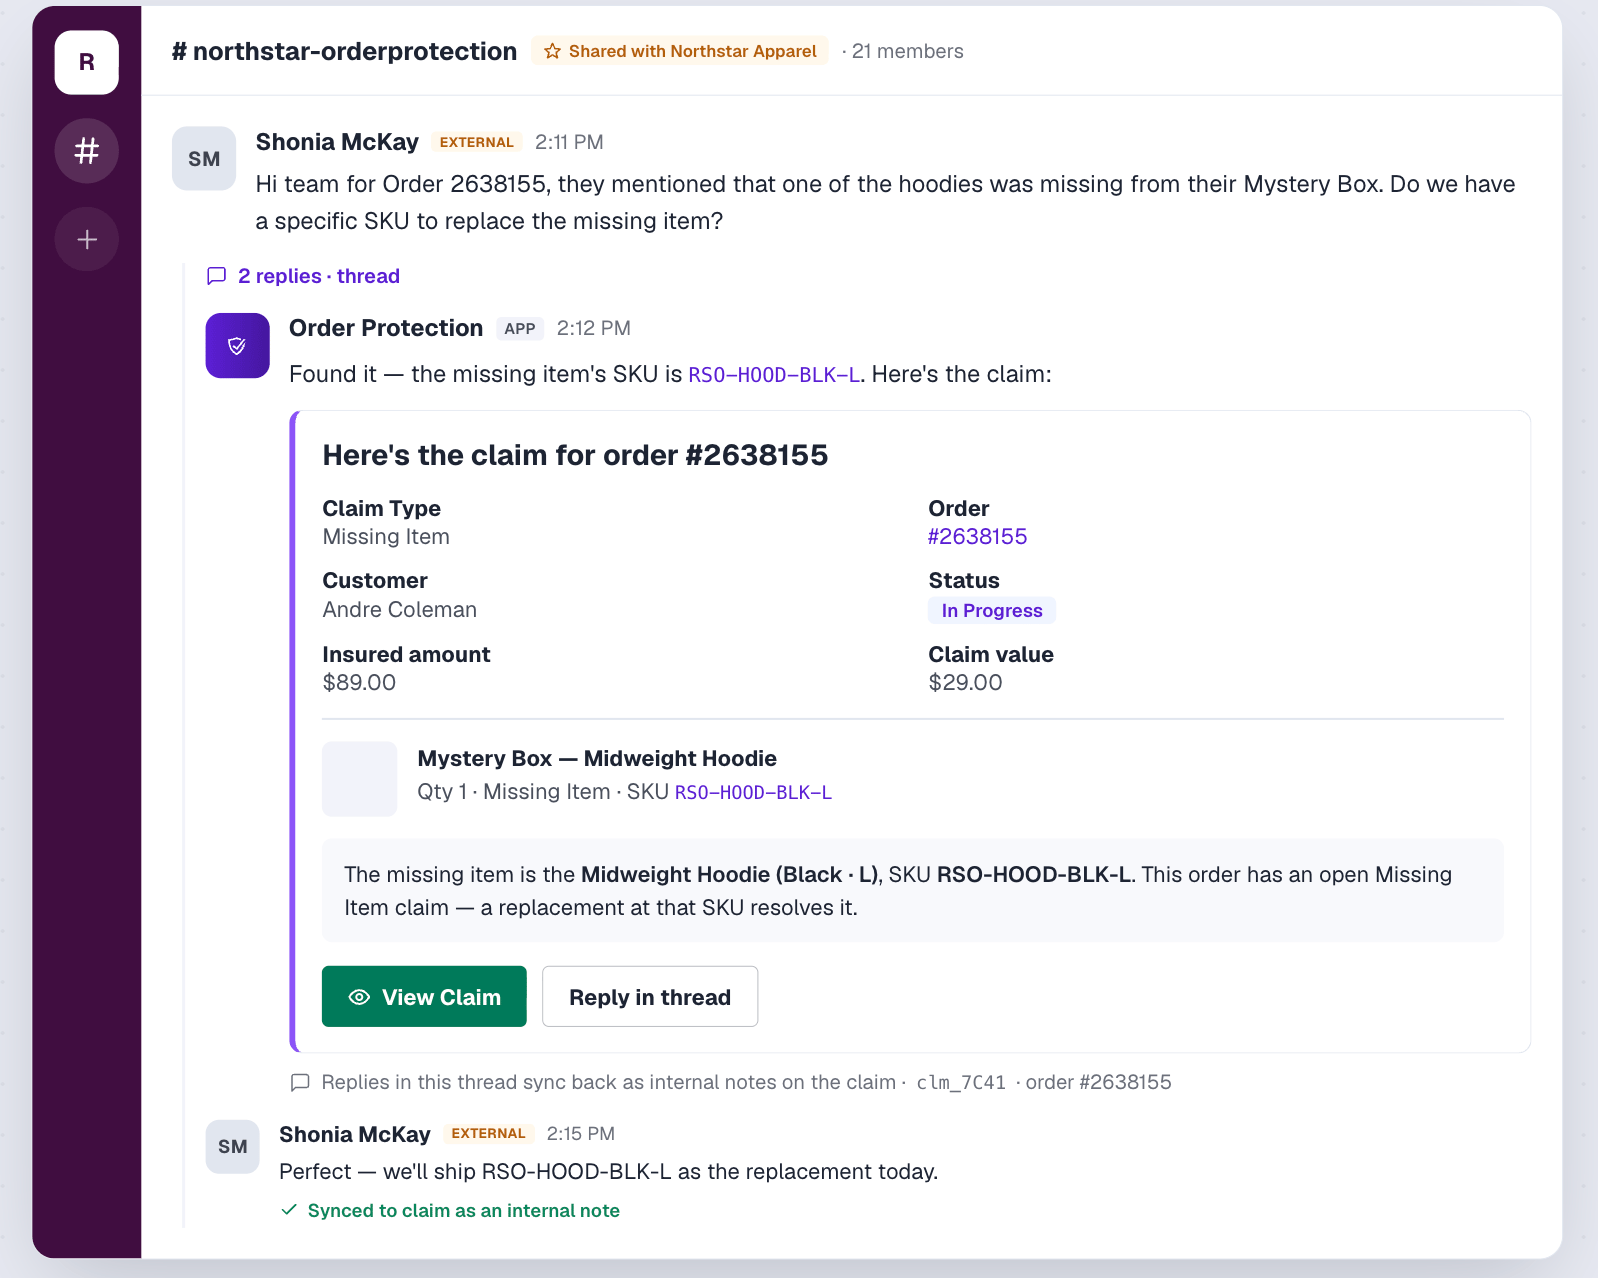
Exporting Claim Data
To download claim data for your records or analysis:1
Navigate to Claims
Open the Claims page.
2
Choose a status and filters
Select a status tab and add any filters you want to apply.
3
Export to CSV
Select Export in the top-right corner to generate a CSV file.