> ## Documentation Index
> Fetch the complete documentation index at: https://docs.orderprotection.com/llms.txt
> Use this file to discover all available pages before exploring further.
# A/B Testing
> Set up, configure, and analyze A/B tests in the Order Protection app for Shopify.
## Setting Up Your Test Settings in Shopify
Before you can start your A/B tests within the Order Protection app, you need to configure a few settings.
From Settings, click on Customer Events.
 Once in the Customer Events settings, click
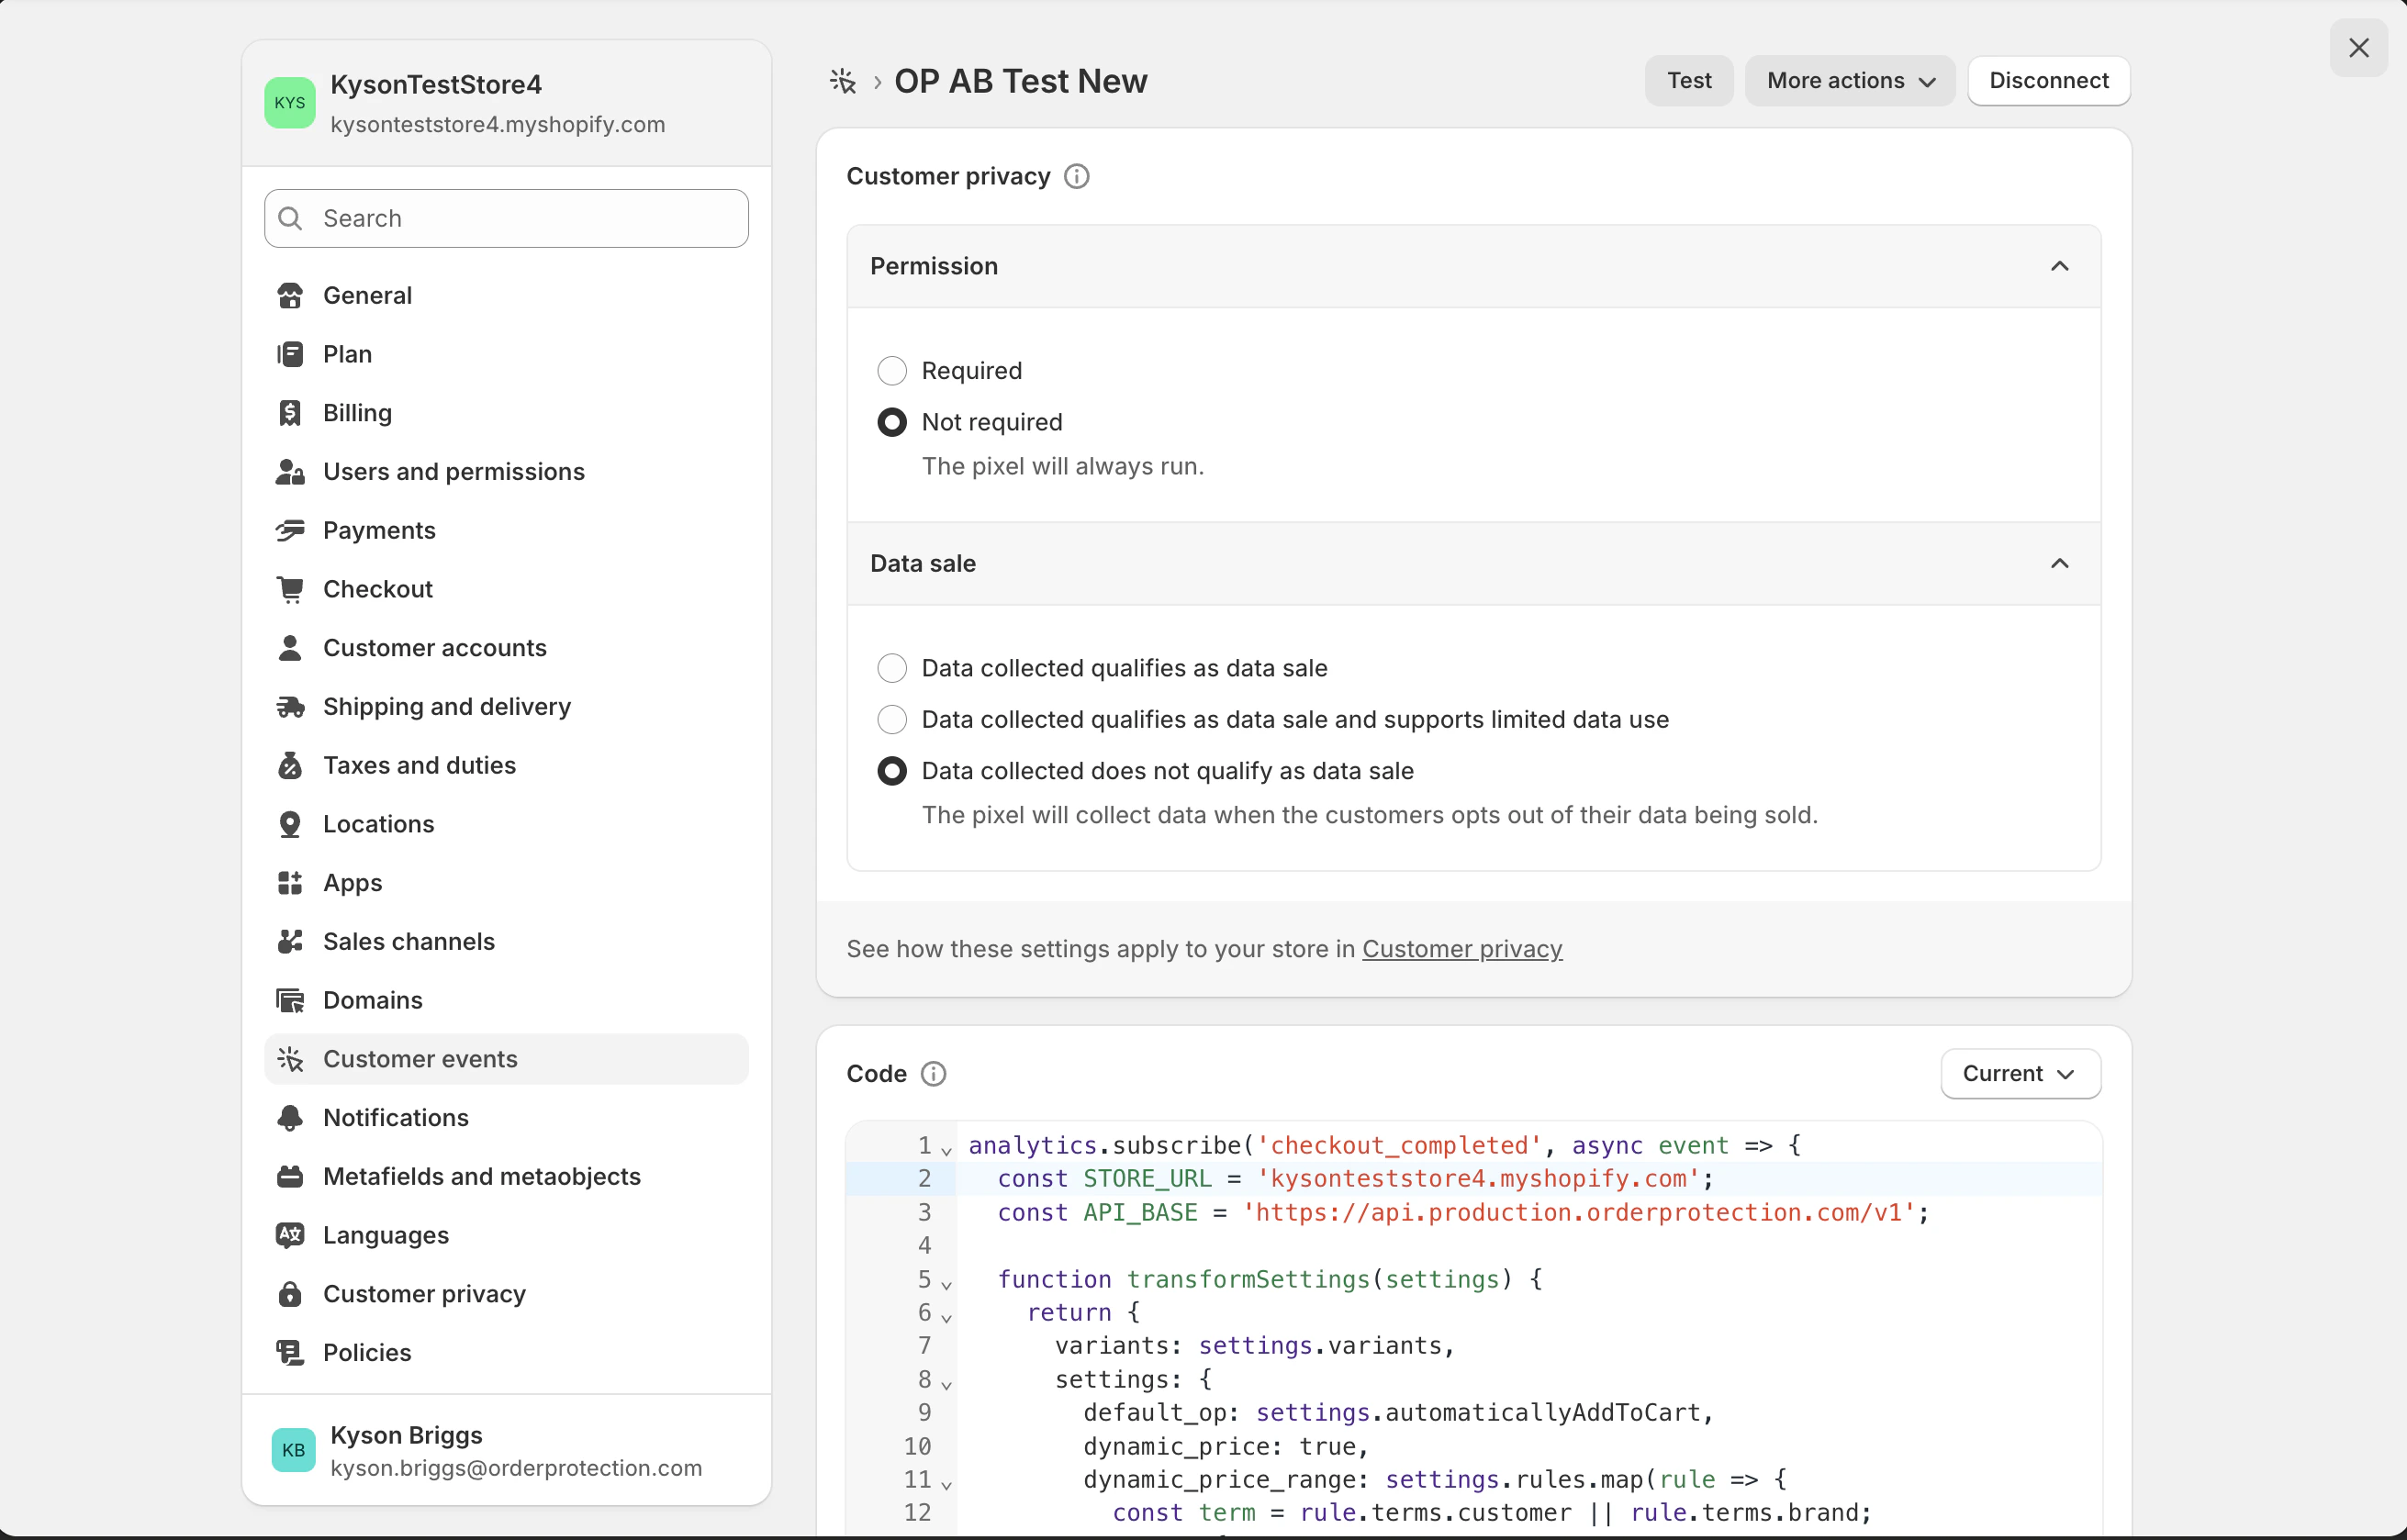
 Add custom pixel. Name it "Order Protection A/B Testing" or something similar to know the testing is originating in the OP app.
 Once the pixel is added, add the custom script below.
```javascript expandable theme={null}
analytics.subscribe('checkout_completed', async event => {
const STORE_URL = 'kysonteststore4.myshopify.com';
const API_BASE = 'https://api.production.orderprotection.com/v1';
function transformSettings(settings) {
return {
variants: settings.variants,
settings: {
default_op: settings.automaticallyAddToCart,
dynamic_price: true,
dynamic_price_range: settings.rules.map(rule => {
const term = rule.terms.customer || rule.terms.brand;
return {
value: rule.min * 100,
max: rule.max * 100,
insuranceCost: term.type === 'percentage' ? term.amount : term.amount * 100,
isPercentage: term.type === 'percentage',
paidBy: rule.terms.customer ? 'customer' : 'brand',
};
}),
splitTestSettings: settings.splitTestSettings || null,
},
};
}
function extractSplitTestFromWidgetConfig(widgetConfig) {
const configArray = Array.isArray(widgetConfig) ? widgetConfig : [widgetConfig];
const configWithSplitTest = configArray.find(c => c?.splitTestSettings?.token);
return configWithSplitTest?.splitTestSettings || null;
}
async function fetchWidgetConfig(widgetType) {
const response = await fetch(`${API_BASE}/widget/config?id=${STORE_URL}&type=${widgetType}`);
if (!response.ok) return null;
const widgetConfig = await response.json();
return extractSplitTestFromWidgetConfig(widgetConfig);
}
async function checkWidgetViewed(testId, token) {
const response = await fetch(`${API_BASE}/tests/${testId}/${token}`);
return response.ok;
}
async function getWidgetStyleSplitTest(testId) {
const widgetTypes = ['CHECKOUT', 'CART'];
const results = await Promise.allSettled(widgetTypes.map(fetchWidgetConfig));
const splitTestSettings = results.find(r => r.status === 'fulfilled' && r.value)?.value || null;
if (!splitTestSettings?.token) return null;
const wasViewed = await checkWidgetViewed(testId, splitTestSettings.token);
if (!wasViewed) return null;
return splitTestSettings;
}
async function getNonWidgetStyleSplitTest(testId) {
const storeResponse = await fetch(`${API_BASE}/quote/insurance?store_url=${STORE_URL}`);
if (!storeResponse.ok) return null;
const rawStoreSettings = await storeResponse.json();
const store_settings = transformSettings(rawStoreSettings);
const splitTestFromStore = store_settings?.settings?.splitTestSettings;
if (!splitTestFromStore?.token) return null;
const viewedWidgetResponse = await fetch(`${API_BASE}/tests/${testId}/${splitTestFromStore.token}`);
if (!viewedWidgetResponse.ok) return null;
return splitTestFromStore;
}
function sendTestEvent(splitTestSettings, orderId, purchasedOp) {
fetch(`${API_BASE}/tests/event`, {
method: 'POST',
headers: { 'Content-Type': 'application/json' },
body: JSON.stringify({
type: 'checkout:completed',
testId: splitTestSettings.id,
sessionId: splitTestSettings.token,
metadata: {
isOriginal: splitTestSettings.isOriginal,
settingsType: splitTestSettings.type,
orderId,
purchasedOp,
},
}),
}).catch(err => console.error('Failed to send test event:', err));
}
async function initSplitTest() {
try {
const testResponse = await fetch(`${API_BASE}/tests?store=${STORE_URL}`);
if (!testResponse.ok) return;
const hasSplitTest = await testResponse.json();
if (!hasSplitTest?.active || !hasSplitTest?.test) return;
const isWidgetStyleTest = hasSplitTest.test.type === 'WIDGET_STYLE';
const testId = hasSplitTest.test.id;
const splitTestSettings = isWidgetStyleTest ? await getWidgetStyleSplitTest(testId) : await getNonWidgetStyleSplitTest(testId);
if (!splitTestSettings?.token) return;
const purchasedOp = event.data.checkout.lineItems.some(
item => item.variant.product.vendor === 'Order Protection',
);
const orderId = event.data.checkout.order.id;
sendTestEvent(splitTestSettings, orderId, purchasedOp);
} catch (error) {
console.error('Error in initSplitTest:', error);
}
}
initSplitTest();
});
```
It should look something like this.
Once the pixel is added, add the custom script below.
```javascript expandable theme={null}
analytics.subscribe('checkout_completed', async event => {
const STORE_URL = 'kysonteststore4.myshopify.com';
const API_BASE = 'https://api.production.orderprotection.com/v1';
function transformSettings(settings) {
return {
variants: settings.variants,
settings: {
default_op: settings.automaticallyAddToCart,
dynamic_price: true,
dynamic_price_range: settings.rules.map(rule => {
const term = rule.terms.customer || rule.terms.brand;
return {
value: rule.min * 100,
max: rule.max * 100,
insuranceCost: term.type === 'percentage' ? term.amount : term.amount * 100,
isPercentage: term.type === 'percentage',
paidBy: rule.terms.customer ? 'customer' : 'brand',
};
}),
splitTestSettings: settings.splitTestSettings || null,
},
};
}
function extractSplitTestFromWidgetConfig(widgetConfig) {
const configArray = Array.isArray(widgetConfig) ? widgetConfig : [widgetConfig];
const configWithSplitTest = configArray.find(c => c?.splitTestSettings?.token);
return configWithSplitTest?.splitTestSettings || null;
}
async function fetchWidgetConfig(widgetType) {
const response = await fetch(`${API_BASE}/widget/config?id=${STORE_URL}&type=${widgetType}`);
if (!response.ok) return null;
const widgetConfig = await response.json();
return extractSplitTestFromWidgetConfig(widgetConfig);
}
async function checkWidgetViewed(testId, token) {
const response = await fetch(`${API_BASE}/tests/${testId}/${token}`);
return response.ok;
}
async function getWidgetStyleSplitTest(testId) {
const widgetTypes = ['CHECKOUT', 'CART'];
const results = await Promise.allSettled(widgetTypes.map(fetchWidgetConfig));
const splitTestSettings = results.find(r => r.status === 'fulfilled' && r.value)?.value || null;
if (!splitTestSettings?.token) return null;
const wasViewed = await checkWidgetViewed(testId, splitTestSettings.token);
if (!wasViewed) return null;
return splitTestSettings;
}
async function getNonWidgetStyleSplitTest(testId) {
const storeResponse = await fetch(`${API_BASE}/quote/insurance?store_url=${STORE_URL}`);
if (!storeResponse.ok) return null;
const rawStoreSettings = await storeResponse.json();
const store_settings = transformSettings(rawStoreSettings);
const splitTestFromStore = store_settings?.settings?.splitTestSettings;
if (!splitTestFromStore?.token) return null;
const viewedWidgetResponse = await fetch(`${API_BASE}/tests/${testId}/${splitTestFromStore.token}`);
if (!viewedWidgetResponse.ok) return null;
return splitTestFromStore;
}
function sendTestEvent(splitTestSettings, orderId, purchasedOp) {
fetch(`${API_BASE}/tests/event`, {
method: 'POST',
headers: { 'Content-Type': 'application/json' },
body: JSON.stringify({
type: 'checkout:completed',
testId: splitTestSettings.id,
sessionId: splitTestSettings.token,
metadata: {
isOriginal: splitTestSettings.isOriginal,
settingsType: splitTestSettings.type,
orderId,
purchasedOp,
},
}),
}).catch(err => console.error('Failed to send test event:', err));
}
async function initSplitTest() {
try {
const testResponse = await fetch(`${API_BASE}/tests?store=${STORE_URL}`);
if (!testResponse.ok) return;
const hasSplitTest = await testResponse.json();
if (!hasSplitTest?.active || !hasSplitTest?.test) return;
const isWidgetStyleTest = hasSplitTest.test.type === 'WIDGET_STYLE';
const testId = hasSplitTest.test.id;
const splitTestSettings = isWidgetStyleTest ? await getWidgetStyleSplitTest(testId) : await getNonWidgetStyleSplitTest(testId);
if (!splitTestSettings?.token) return;
const purchasedOp = event.data.checkout.lineItems.some(
item => item.variant.product.vendor === 'Order Protection',
);
const orderId = event.data.checkout.order.id;
sendTestEvent(splitTestSettings, orderId, purchasedOp);
} catch (error) {
console.error('Error in initSplitTest:', error);
}
}
initSplitTest();
});
```
It should look something like this.
 Before you save the file, you need to swap out the following in quotations
 const STORE\_URL = 'kysonteststore4.myshopify.com';
with your Shopify store URL. The store URL can be found at the top of the left navigation in settings as well as at the top of the current custom pixel page you are populating.
This URL **must** be your myshopify URL for it to work properly. The Shopify URL will be something similar to: \{store\_name}.myshopify.com.
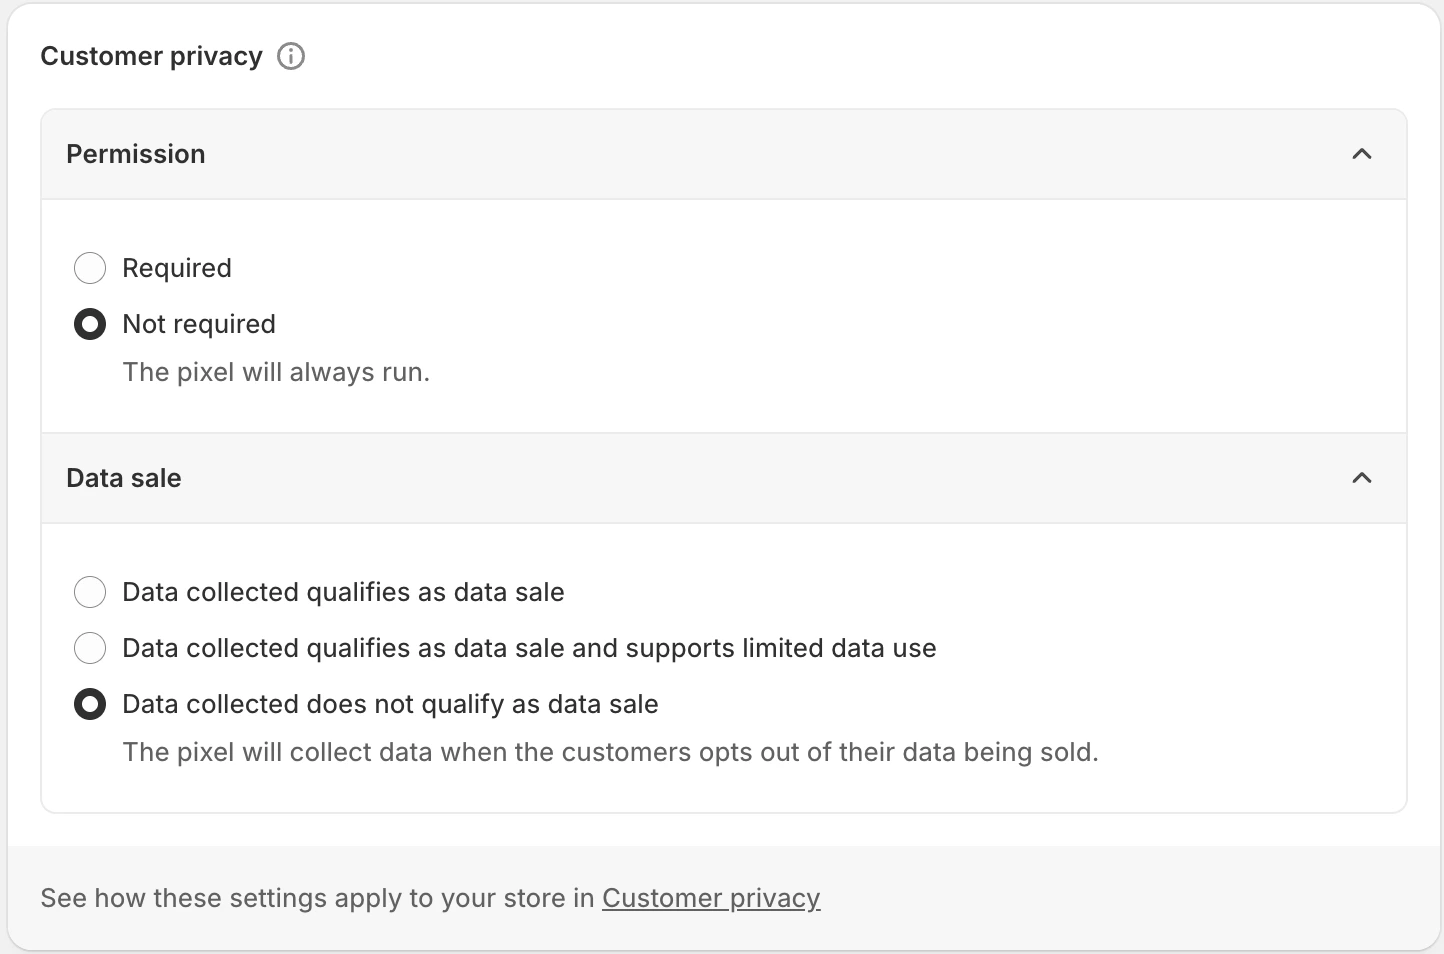
Scroll to the Customer privacy section of the custom pixel and configure the following settings so the pixel always runs and can collect the data needed for A/B testing:
* **Permission**: Select Not required. The pixel will always run.
* **Data sale**: Select Data collected does not qualify as data sale.
 After saving the custom pixel, make sure to **Connect** it from the custom pixel page. A saved pixel will not fire until it is connected, and your A/B test will not receive any event data until this step is completed. 🙌
Now that you have configured your custom pixel, you're ready to start A/B testing. Log back in to app.orderprotection.com, navigate to to the
After saving the custom pixel, make sure to **Connect** it from the custom pixel page. A saved pixel will not fire until it is connected, and your A/B test will not receive any event data until this step is completed. 🙌
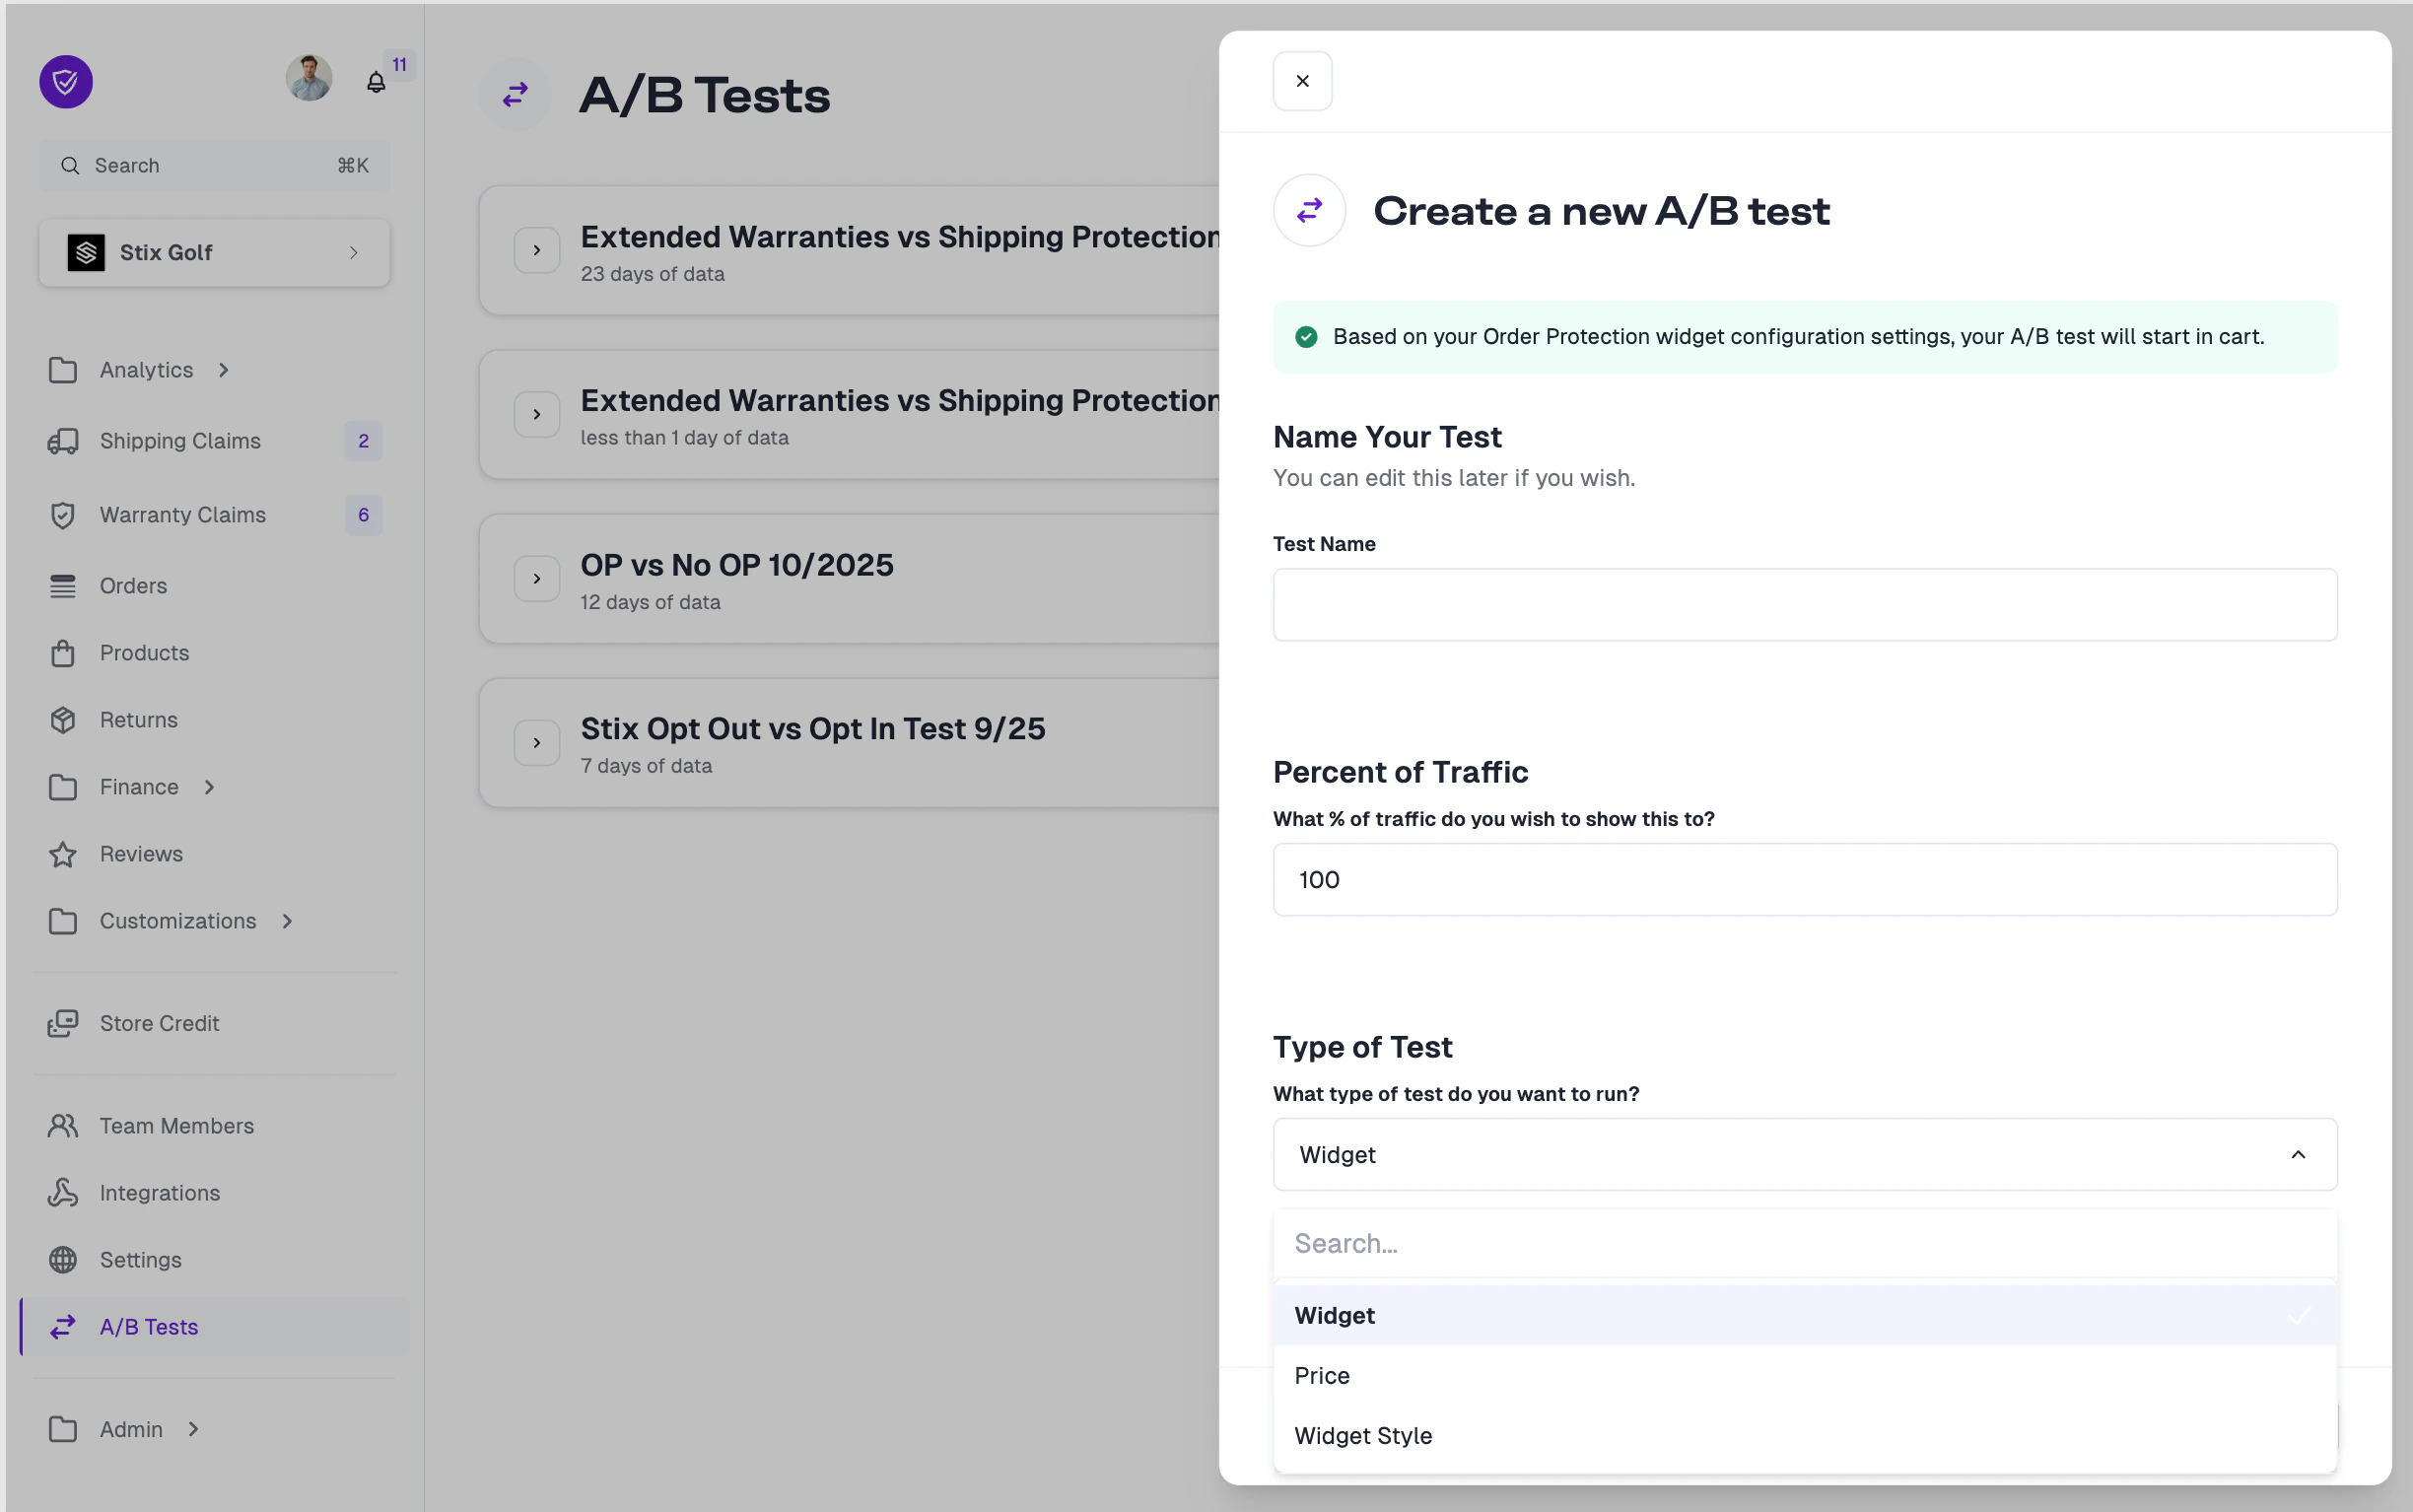
Now that you have configured your custom pixel, you're ready to start A/B testing. Log back in to app.orderprotection.com, navigate to to the A/B Tests tab
in the left navigation and click on Start New Test to get started. Session data will start rolling into the test analytics within a few minutes. Expect 1-2 weeks for results to
reach statistical significance depending on your store traffic volume.
***
## What You Can Test
When creating a new A/B test, you'll choose from three test types. Each type isolates a different variable so you can measure its impact on conversions and revenue.
 Test whether the Order Protection widget defaults to **on** or **off** for
customers at checkout. This is the most common test type for measuring
opt-in vs. opt-out behavior.
Test different pricing structures to find the optimal balance between
customer conversion and revenue. Compare your current pricing against a
variant with adjusted rates.
Test different widget designs and layouts to see which style drives the
highest engagement and attach rate.
***
## Configuring Your Test
After selecting your test type, you'll configure the test details. Each test type has its own configuration options.
### Pricing Tests
When you select **Price** as the test type, you'll see your current pricing displayed as the **Original** variant. This is pulled directly from your store's existing price settings and cannot be edited within the test — it serves as your control group.
Create a **Variant** with adjusted pricing to test against the original. You can modify both the flat rate and percentage-based pricing tiers for different order value ranges.
Test whether the Order Protection widget defaults to **on** or **off** for
customers at checkout. This is the most common test type for measuring
opt-in vs. opt-out behavior.
Test different pricing structures to find the optimal balance between
customer conversion and revenue. Compare your current pricing against a
variant with adjusted rates.
Test different widget designs and layouts to see which style drives the
highest engagement and attach rate.
***
## Configuring Your Test
After selecting your test type, you'll configure the test details. Each test type has its own configuration options.
### Pricing Tests
When you select **Price** as the test type, you'll see your current pricing displayed as the **Original** variant. This is pulled directly from your store's existing price settings and cannot be edited within the test — it serves as your control group.
Create a **Variant** with adjusted pricing to test against the original. You can modify both the flat rate and percentage-based pricing tiers for different order value ranges.
 Once you start a test, you will not be able to edit the variants to maintain
the integrity of the test. You can always end the test and start a new one if
you need to adjust your pricing.
### Widget Style Tests
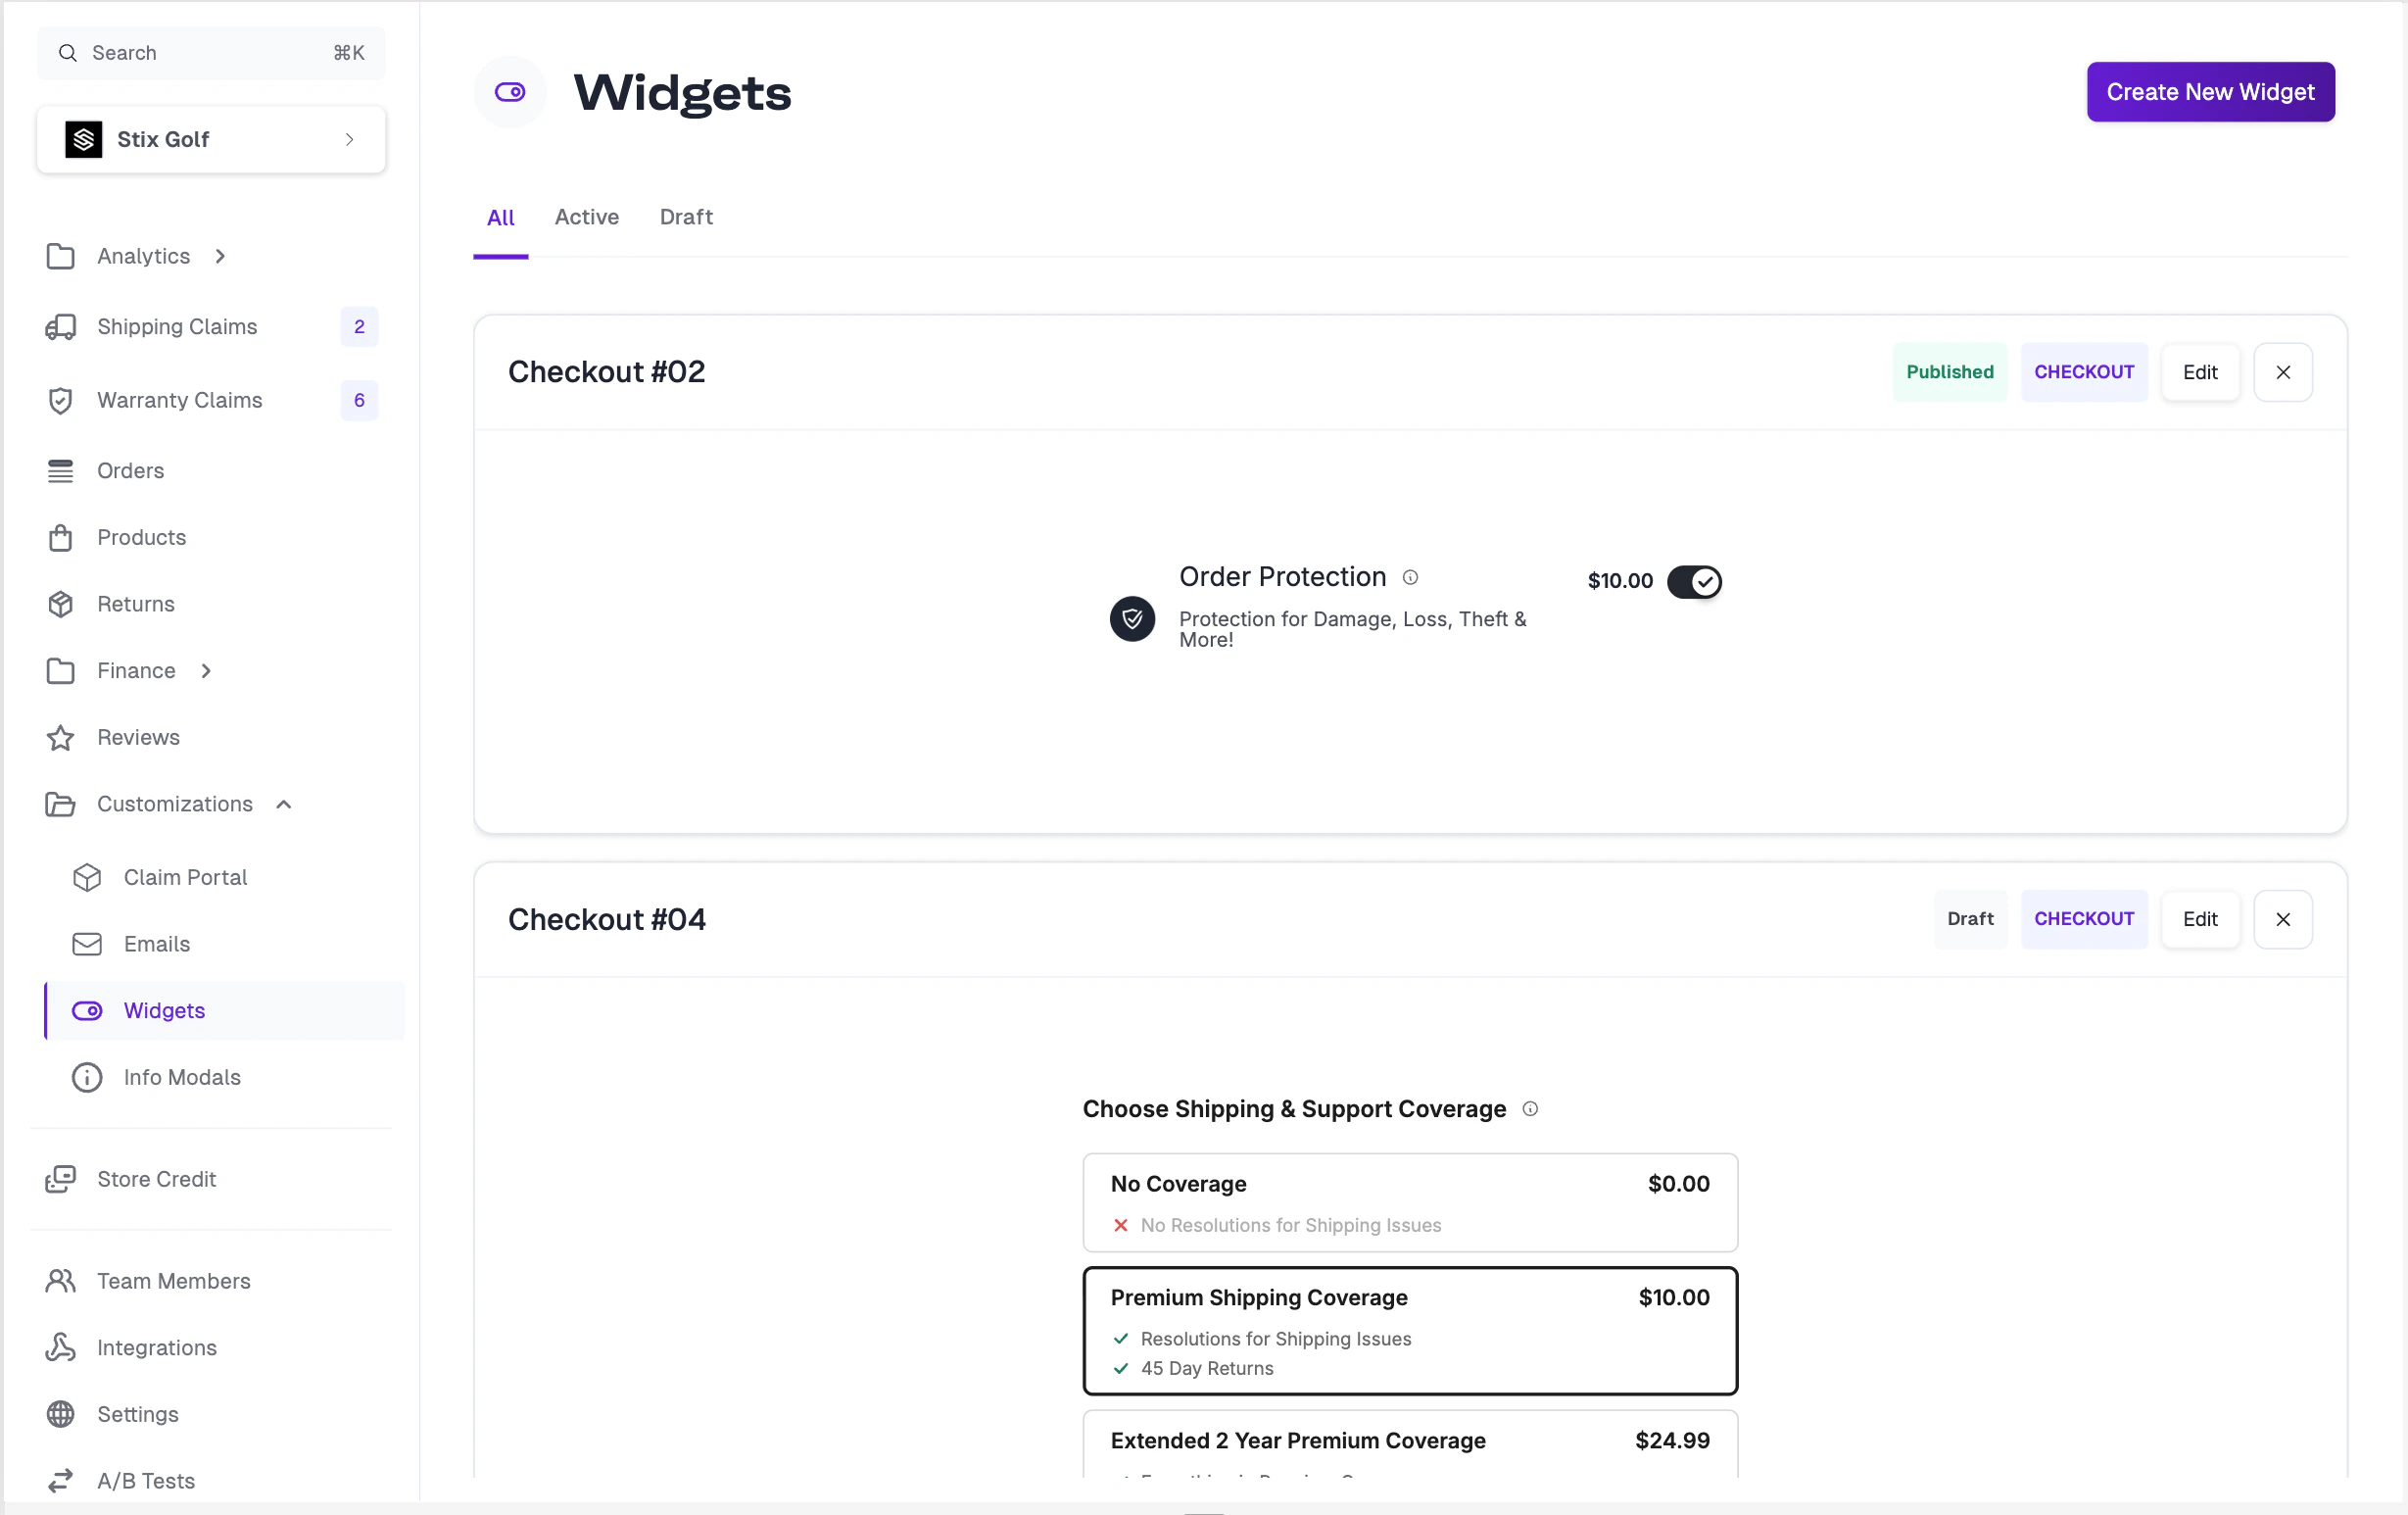
Widget style tests let you compare two different widget designs to determine which performs better. Before setting up this test type, you'll need at least two widget configurations created in the **Customizations** section.
To learn how to create and customize widgets, see the [Widget
Customization](/education-basecamp/widgets) guide.
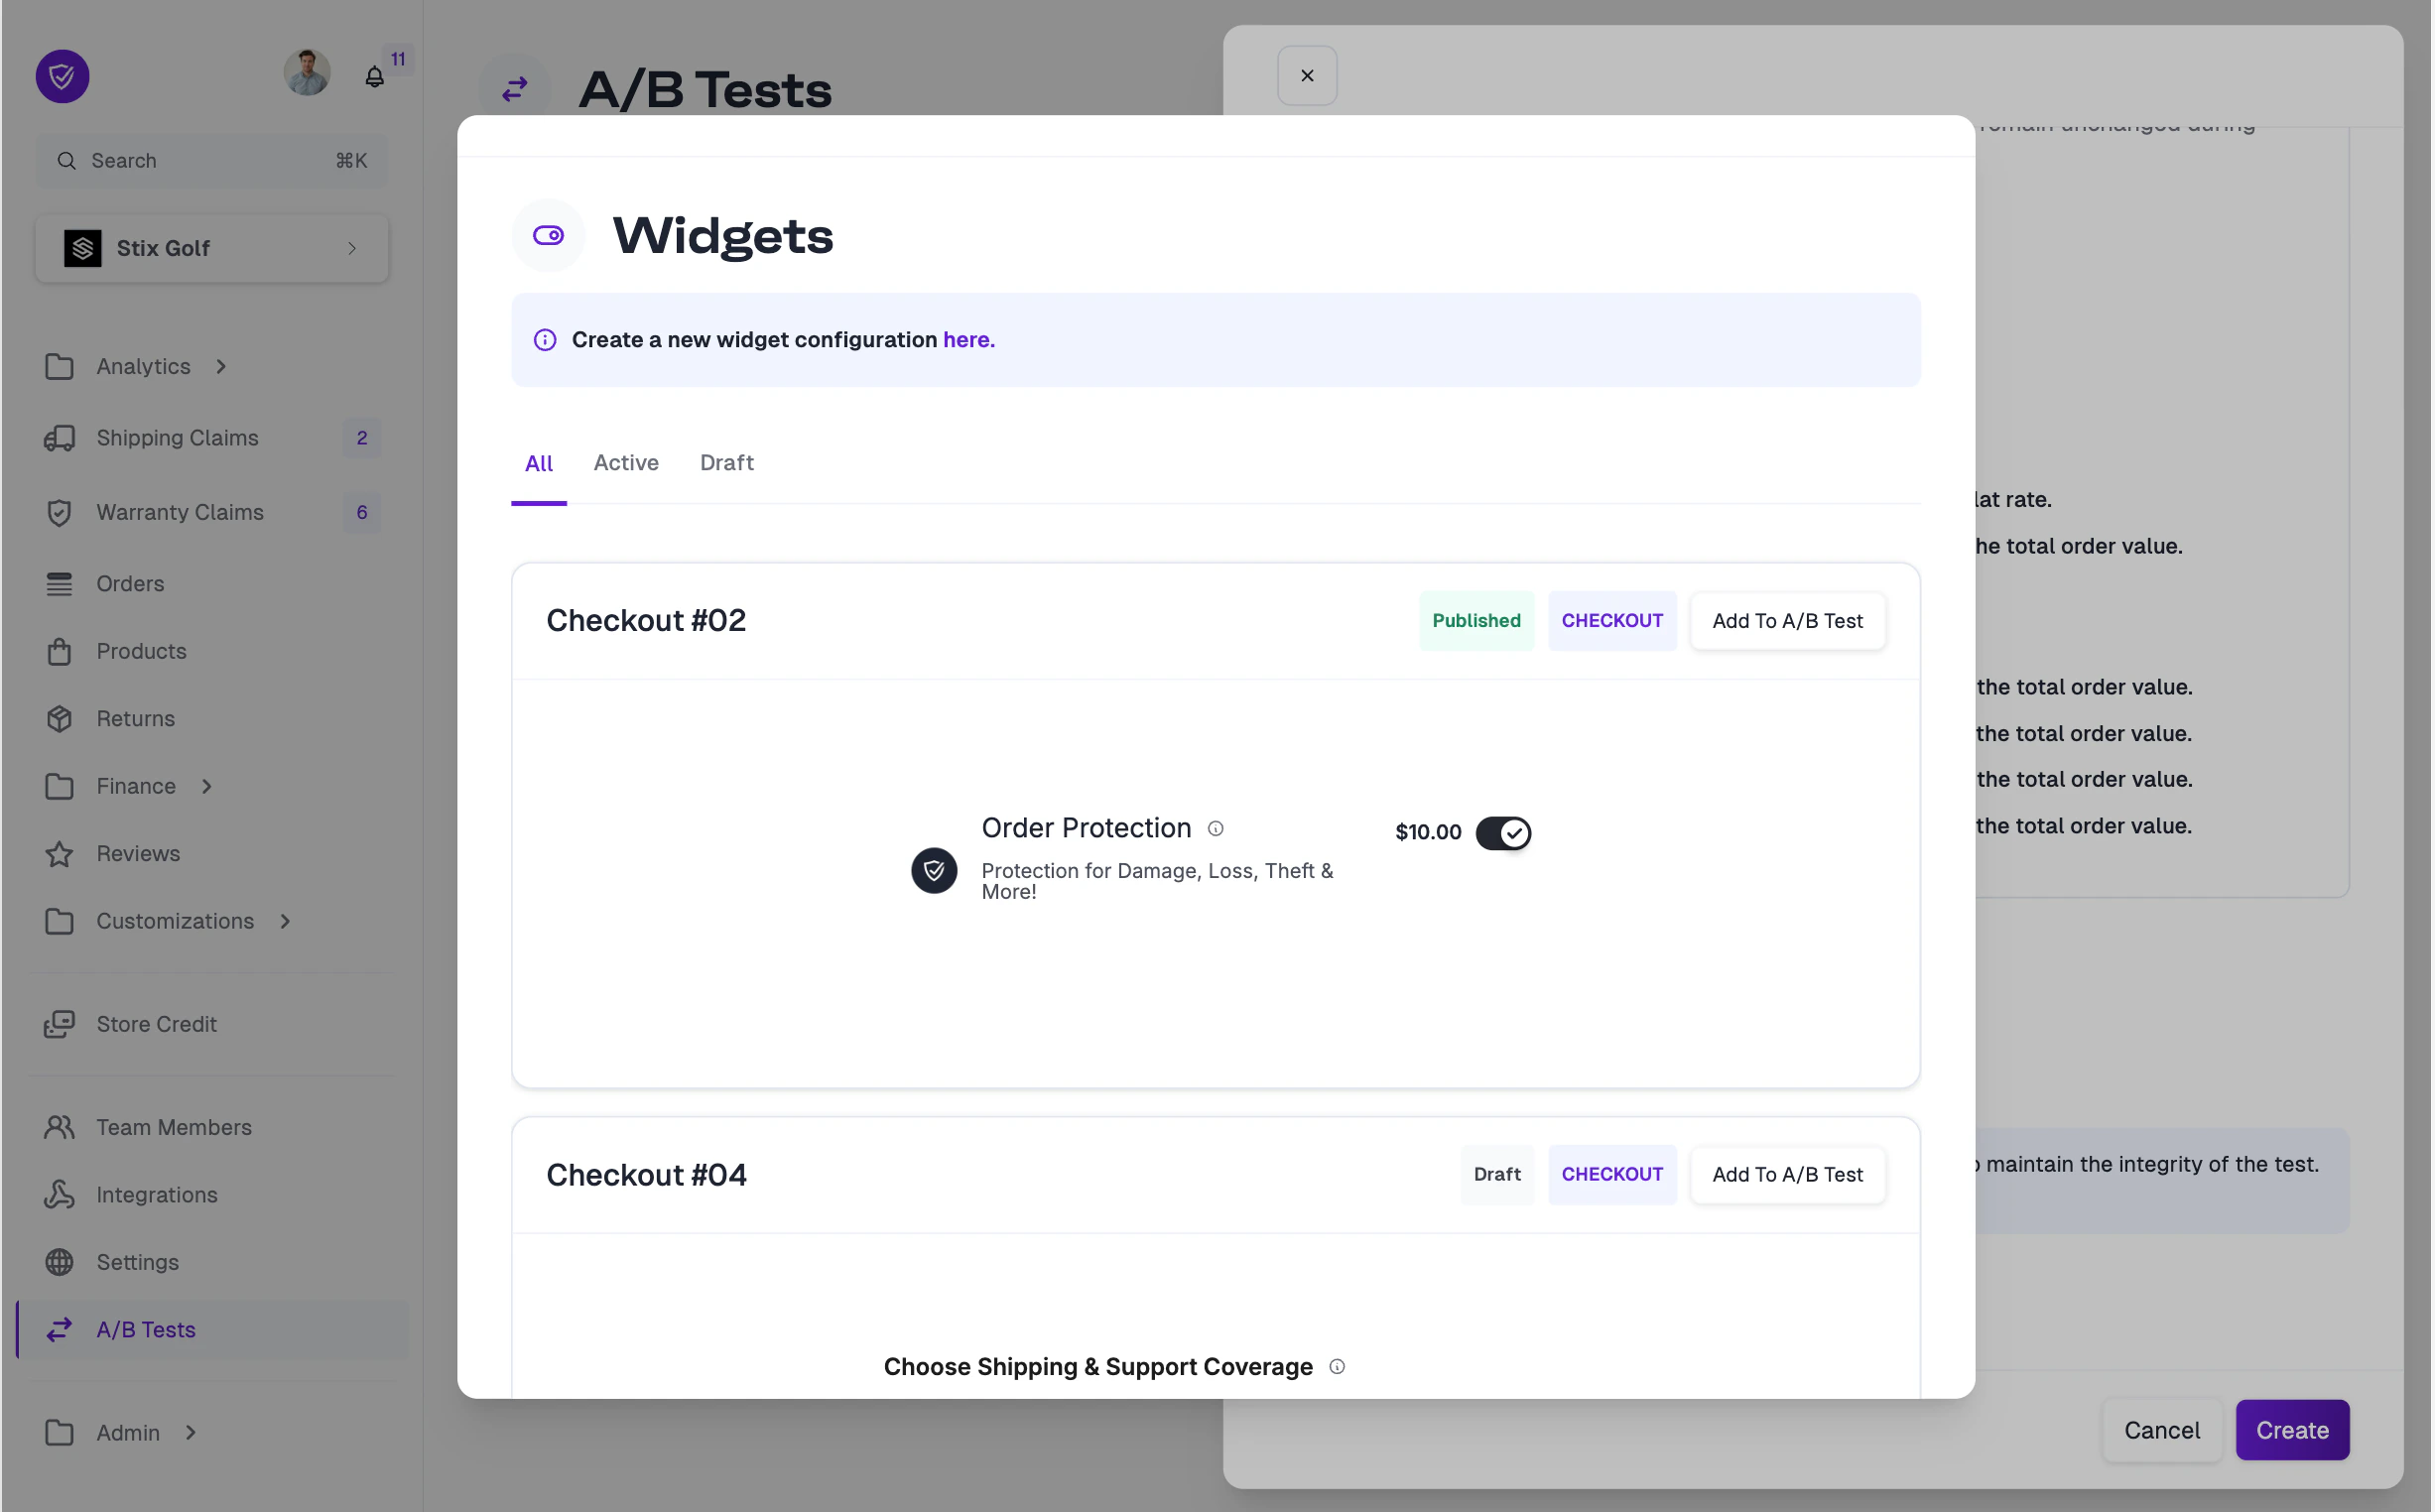
Navigate to **Customizations > Widgets** to view your available widget configurations. You'll need both a published widget (your control) and at least one additional widget to use as a variant.
Once you start a test, you will not be able to edit the variants to maintain
the integrity of the test. You can always end the test and start a new one if
you need to adjust your pricing.
### Widget Style Tests
Widget style tests let you compare two different widget designs to determine which performs better. Before setting up this test type, you'll need at least two widget configurations created in the **Customizations** section.
To learn how to create and customize widgets, see the [Widget
Customization](/education-basecamp/widgets) guide.
Navigate to **Customizations > Widgets** to view your available widget configurations. You'll need both a published widget (your control) and at least one additional widget to use as a variant.
 When you select **Widget Style** as the test type, a widget picker will appear showing your available widget configurations. Each widget has an **Add To A/B Test** button — select the widgets you want to compare.
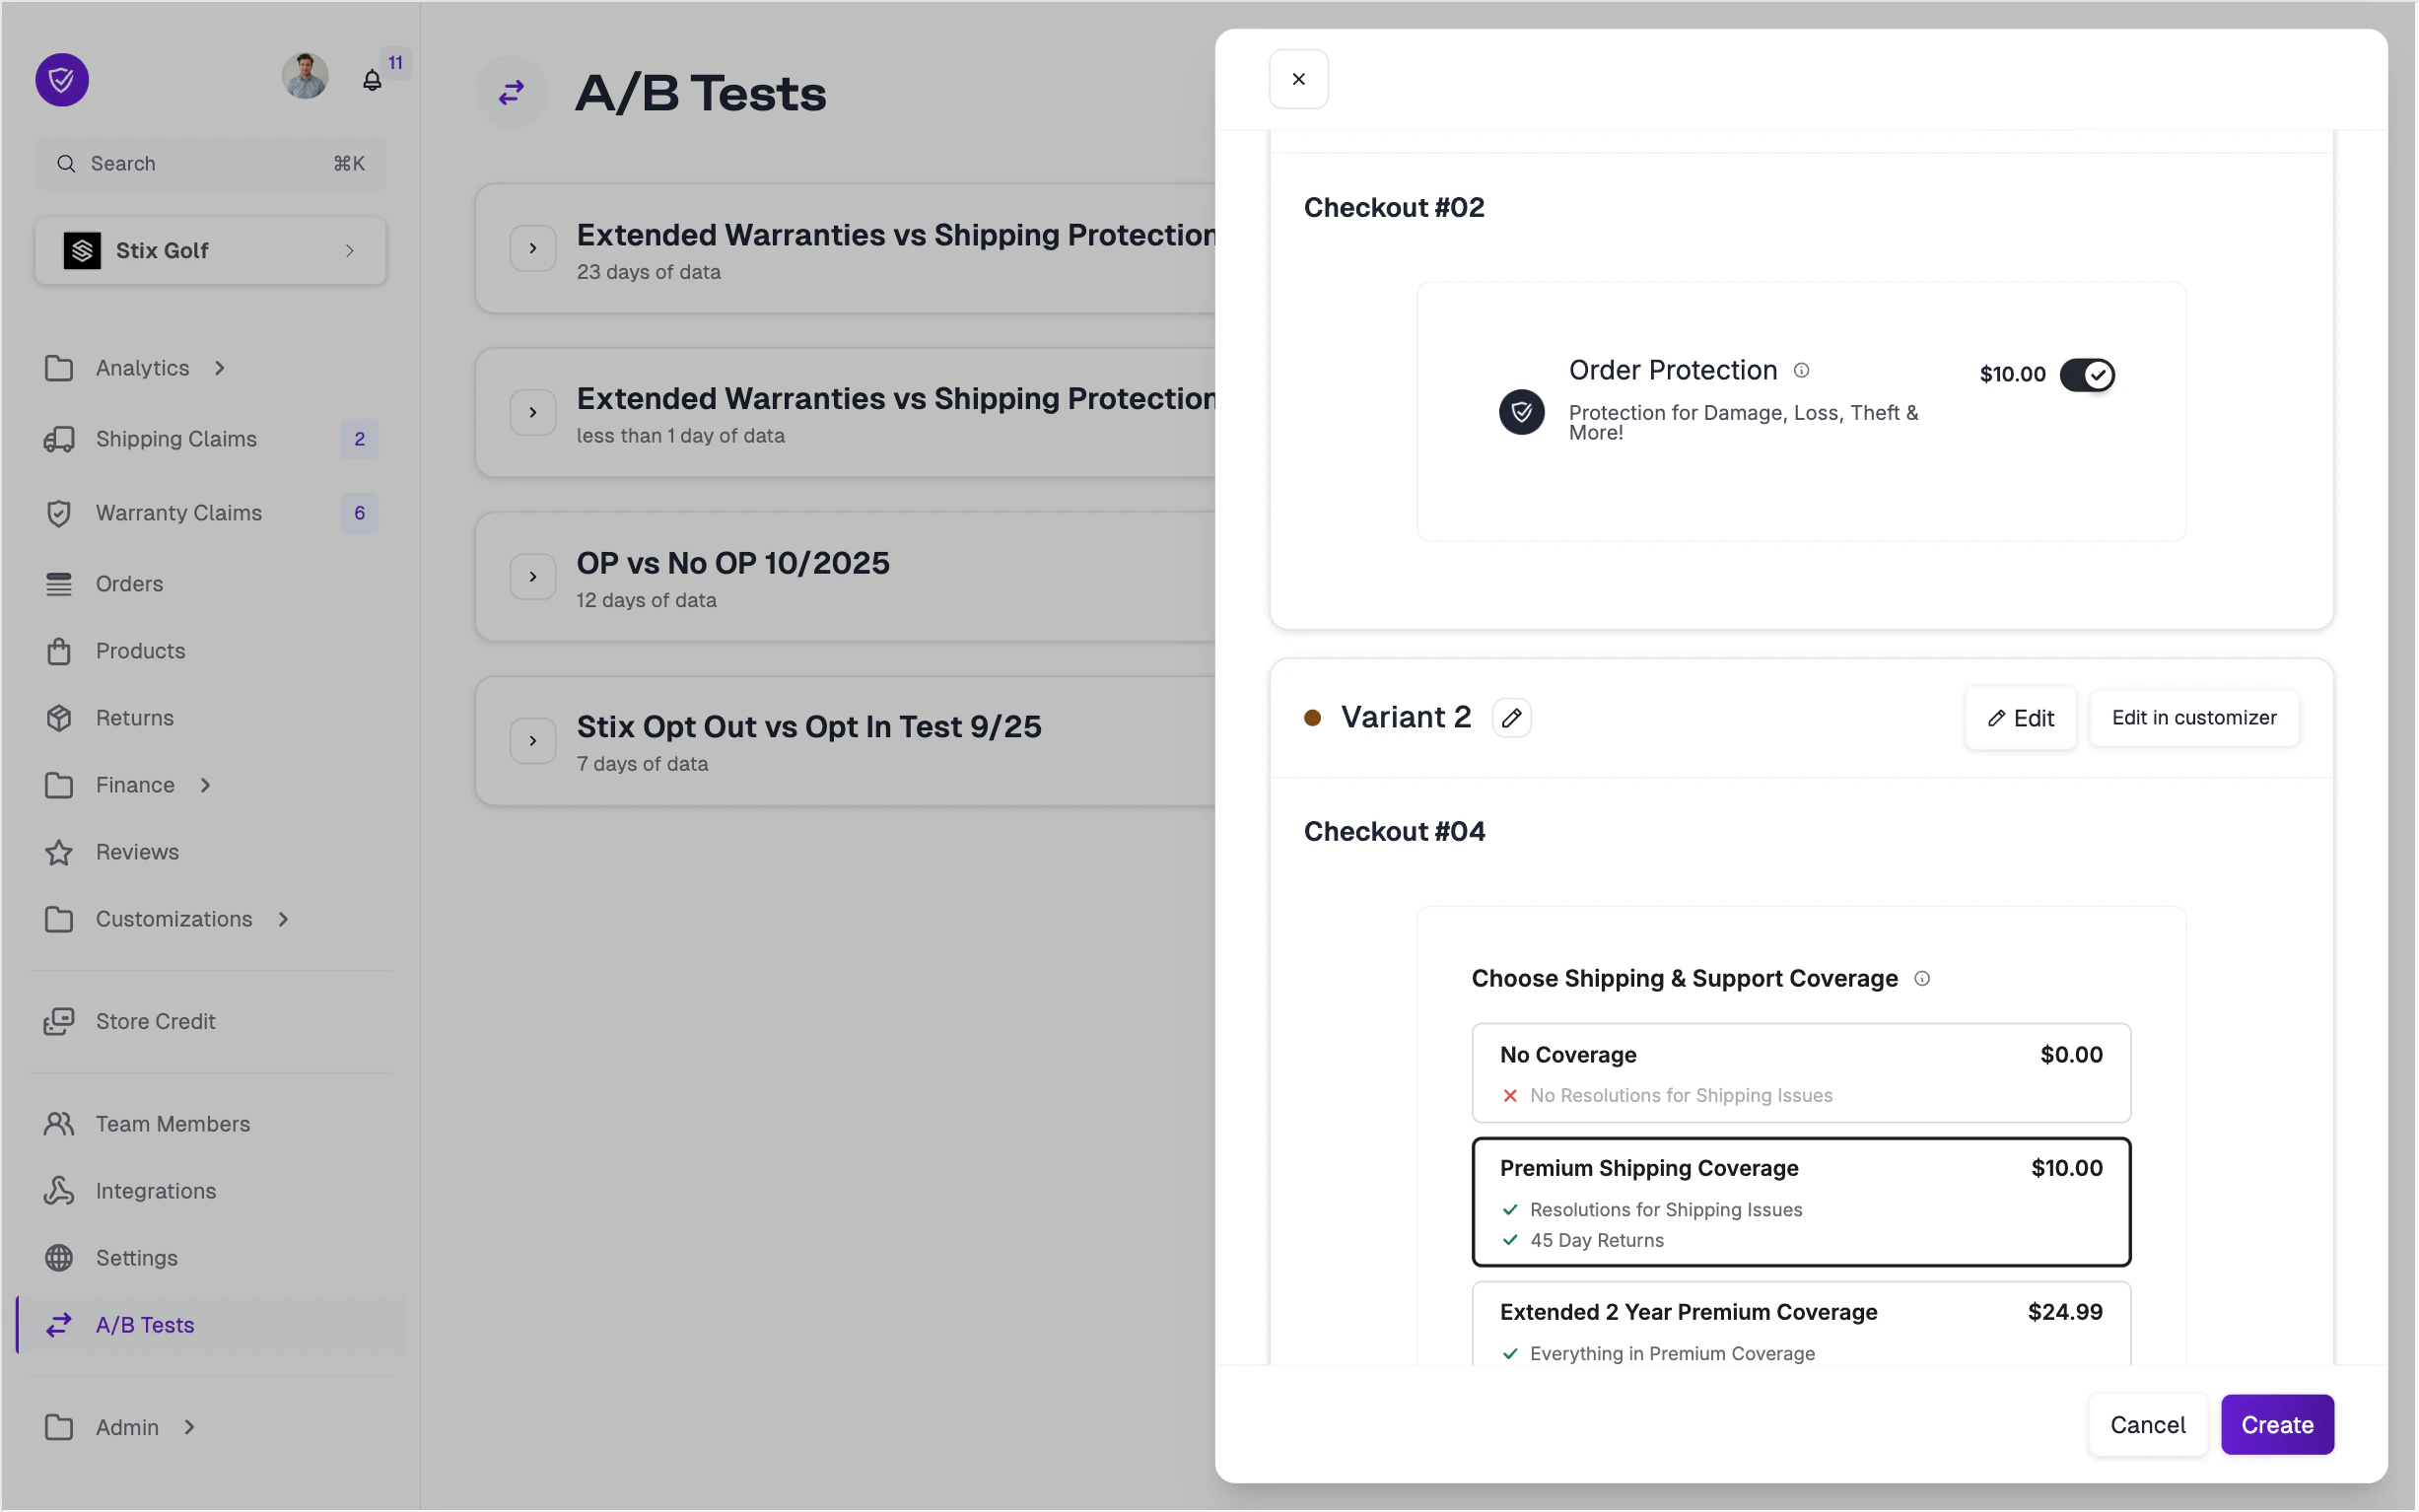
 Once selected, you'll see a preview of each variant showing the control widget and the variant widget side by side.
 ***
## Checking Your Results
Once your test is running, you can monitor results in real time from the **A/B Tests** tab. Click on any active or completed test to view the results dashboard.
***
## Checking Your Results
Once your test is running, you can monitor results in real time from the **A/B Tests** tab. Click on any active or completed test to view the results dashboard.
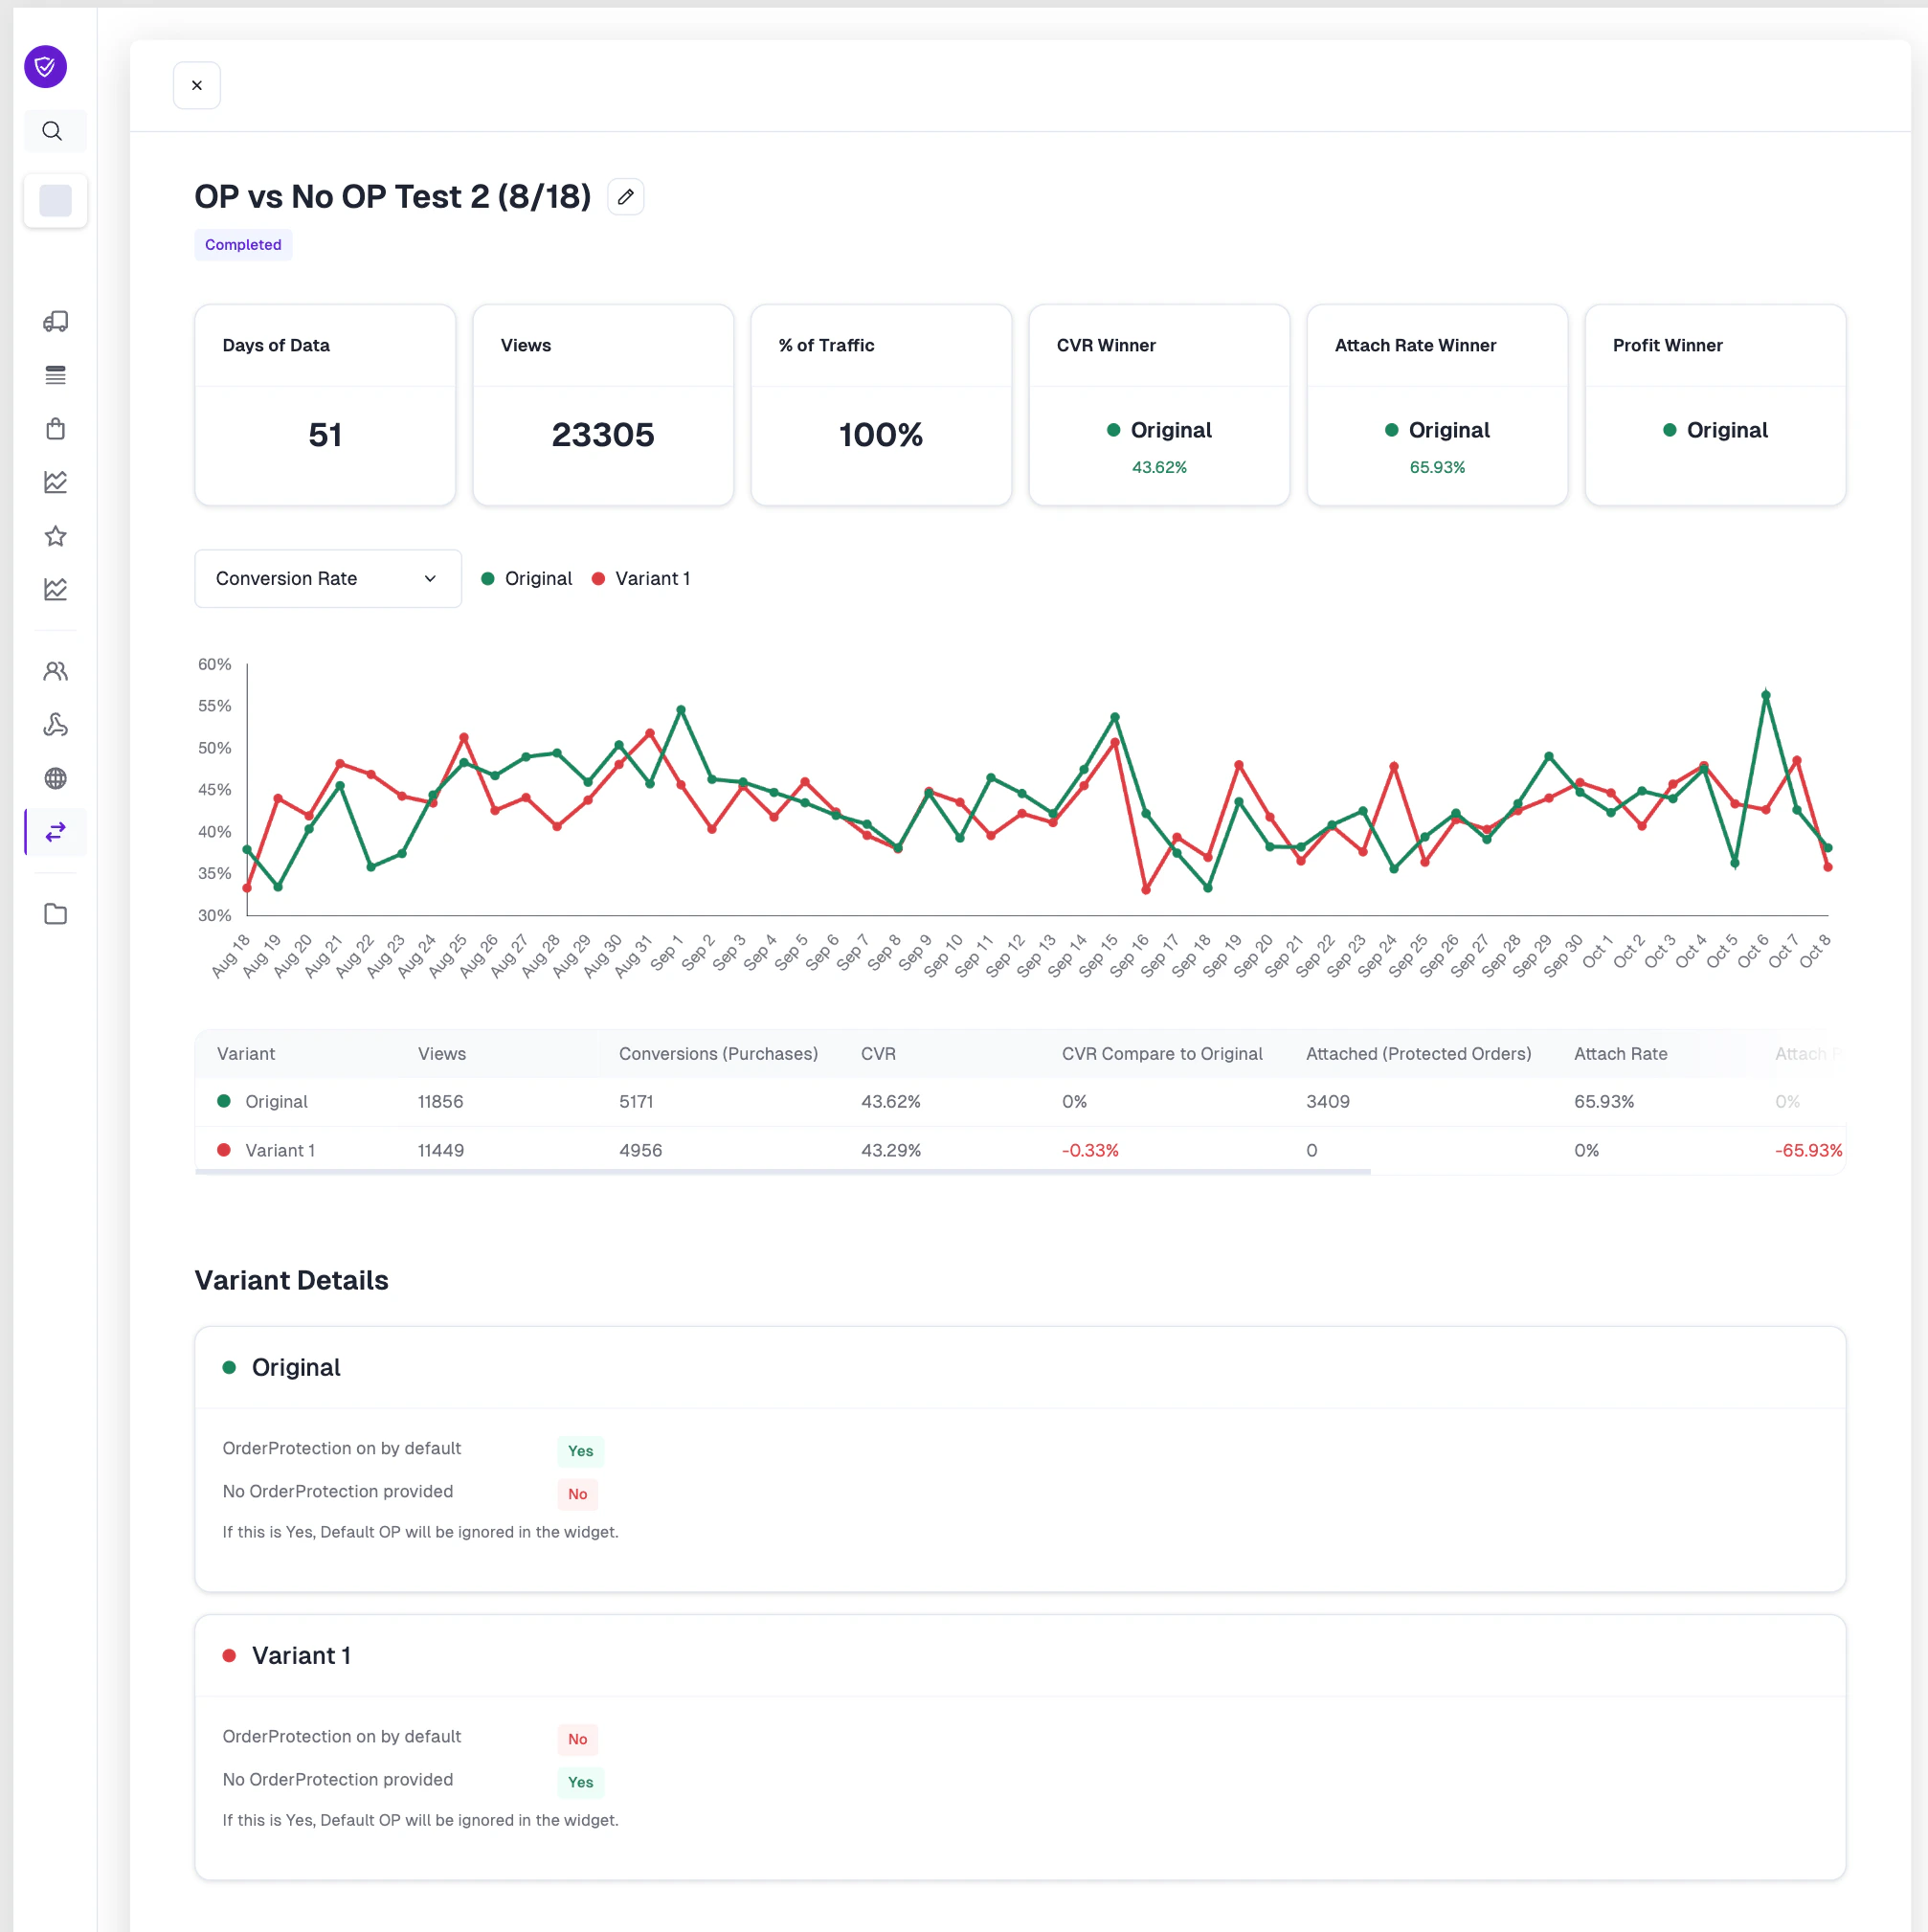 All metrics are calculated starting from when the A/B test was launched — not
from when your store was created or when Order Protection was installed. This
ensures a clean comparison between your test variants.
### Understanding Your Metrics
The results dashboard shows a summary row at the top with key winner indicators, a time-series chart for tracking trends, and a detailed comparison table. Here's what each metric means:
| Metric | What It Measures |
| ------------------------- | ---------------------------------------------------------------------------------------------------------------------- |
| **Views** | The number of times the Order Protection widget was displayed to customers in each variant. |
| **Conversions** | The number of completed checkouts per variant, regardless of whether Order Protection was purchased. |
| **CVR (Conversion Rate)** | The percentage of widget views that resulted in a completed checkout. Calculated as `Conversions / Views`. |
| **Attach Rate** | The percentage of orders that included Order Protection, per variant. Calculated as `Protected Orders / Total Orders`. |
| **Profit** | Estimated profit generated from Order Protection fees based on your revenue share agreement. |
Views represent the total number of times the Order Protection widget was rendered and visible to a customer during their shopping session. Each unique session where the widget loads counts as one view.
The results table breaks views down per variant, so you can see whether traffic was split evenly. A significant imbalance in views between variants may indicate that the test needs more time to normalize.
Conversions track the number of completed purchases (checkouts) within each test variant. This metric captures all orders — both those that included Order Protection and those that did not.
The **CVR (Conversion Rate)** is calculated as:
`CVR = Conversions / Views x 100`
The **CVR Compare to Original** column shows the percentage-point difference between each variant and the original, making it easy to spot whether a variant is helping or hurting overall checkout completion.
Attach rate is the most important metric for most A/B tests. It measures the percentage of total orders in a variant that included Order Protection.
`Attach Rate = Protected Orders / Total Orders x 100`
For example, if 3,409 out of 5,171 orders in the Original variant included Order Protection, the attach rate is 65.93%. A higher attach rate means more customers are opting in to protection, directly increasing revenue.
The **Attach Rate Winner** in the summary row highlights which variant achieved the highest attach rate.
Profit is calculated based on your **revenue share** agreement with Order Protection. This represents your store's estimated earnings from Order Protection fees collected during the test period.
The calculation considers:
* **Total Order Protection fees collected** per variant (based on the pricing tier and order values)
* **Your revenue share percentage** — the portion of each fee that goes to your store
* **Claim costs** are not factored into this metric; it reflects gross revenue share only
The **Profit Winner** in the summary row indicates which variant generated the most revenue for your store. When evaluating profit, consider it alongside attach rate — a variant with slightly lower attach rate but higher pricing may still generate more total profit.
### Variant Details
At the bottom of the results page, you'll find **Variant Details** showing the exact configuration for each variant. This includes:
* Whether Order Protection was **on by default**
* Whether the **No Order Protection** option was provided
* Any widget style differences between variants
* For **Price** tests, the full pricing tiers and rates for each variant (flat rates, percentage-based rates, and order value ranges)
Use this section to recall exactly what was being tested, especially when reviewing results from older tests.
All metrics are calculated starting from when the A/B test was launched — not
from when your store was created or when Order Protection was installed. This
ensures a clean comparison between your test variants.
### Understanding Your Metrics
The results dashboard shows a summary row at the top with key winner indicators, a time-series chart for tracking trends, and a detailed comparison table. Here's what each metric means:
| Metric | What It Measures |
| ------------------------- | ---------------------------------------------------------------------------------------------------------------------- |
| **Views** | The number of times the Order Protection widget was displayed to customers in each variant. |
| **Conversions** | The number of completed checkouts per variant, regardless of whether Order Protection was purchased. |
| **CVR (Conversion Rate)** | The percentage of widget views that resulted in a completed checkout. Calculated as `Conversions / Views`. |
| **Attach Rate** | The percentage of orders that included Order Protection, per variant. Calculated as `Protected Orders / Total Orders`. |
| **Profit** | Estimated profit generated from Order Protection fees based on your revenue share agreement. |
Views represent the total number of times the Order Protection widget was rendered and visible to a customer during their shopping session. Each unique session where the widget loads counts as one view.
The results table breaks views down per variant, so you can see whether traffic was split evenly. A significant imbalance in views between variants may indicate that the test needs more time to normalize.
Conversions track the number of completed purchases (checkouts) within each test variant. This metric captures all orders — both those that included Order Protection and those that did not.
The **CVR (Conversion Rate)** is calculated as:
`CVR = Conversions / Views x 100`
The **CVR Compare to Original** column shows the percentage-point difference between each variant and the original, making it easy to spot whether a variant is helping or hurting overall checkout completion.
Attach rate is the most important metric for most A/B tests. It measures the percentage of total orders in a variant that included Order Protection.
`Attach Rate = Protected Orders / Total Orders x 100`
For example, if 3,409 out of 5,171 orders in the Original variant included Order Protection, the attach rate is 65.93%. A higher attach rate means more customers are opting in to protection, directly increasing revenue.
The **Attach Rate Winner** in the summary row highlights which variant achieved the highest attach rate.
Profit is calculated based on your **revenue share** agreement with Order Protection. This represents your store's estimated earnings from Order Protection fees collected during the test period.
The calculation considers:
* **Total Order Protection fees collected** per variant (based on the pricing tier and order values)
* **Your revenue share percentage** — the portion of each fee that goes to your store
* **Claim costs** are not factored into this metric; it reflects gross revenue share only
The **Profit Winner** in the summary row indicates which variant generated the most revenue for your store. When evaluating profit, consider it alongside attach rate — a variant with slightly lower attach rate but higher pricing may still generate more total profit.
### Variant Details
At the bottom of the results page, you'll find **Variant Details** showing the exact configuration for each variant. This includes:
* Whether Order Protection was **on by default**
* Whether the **No Order Protection** option was provided
* Any widget style differences between variants
* For **Price** tests, the full pricing tiers and rates for each variant (flat rates, percentage-based rates, and order value ranges)
Use this section to recall exactly what was being tested, especially when reviewing results from older tests.